Replacing a Boat Trailer Axle: When You Need One and How to Order the Right Size
A bent, rusted-through or undersized axle can't be fixed with new bearings. Learn the signs, the difference between straight, drop and torsion axles, the measurements a supplier needs (hub face, spring centers), what to specify for saltwater, and why this is usually a trailer-shop job.
Time
5 h
Shop would charge
$400-1500
Applies to
All engines
Safety first: A trailer with a boat on it can weigh several tons. Never work under it on a jack alone. Dexter recommends jacking only on the trailer frame, never on the springs, hangers or axle tube, and you should support it on rated jack stands with the wheels chocked. Wheels, U-bolts and brakes are safety parts: if you're not sure the job is right, have a trailer shop do it or check it before you tow. If a wheel comes off or an axle fails on the highway, get well off the road, turn on your hazards and call for a tow (and 911 if anyone is hurt or traffic is blocked).
Owners often ask
- My trailer tires wear on one edge and the axle looks bent. How do I measure for a replacement axle?
- Should I get a galvanized or torsion axle for a saltwater boat trailer?
This guide walks you through it. Still stuck? Ask the AI Mechanic about your engine.
Tools
- Tape measure (25 ft) and a helper
- Chalk and a wire brush (to read the axle tag)
- Floor jack and jack stands rated for the trailer (lift on the frame only)
- Wheel chocks
- Socket set, breaker bar and a torque wrench
- Penetrating oil
- Brake bleeding tools (if the trailer has hydraulic brakes)
Parts & supplies
- Complete replacement axle assembly (beam, spindles, hubs or hub-drums, brakes if fitted) built to your measurements
- New U-bolts, plates and nuts (or torsion axle mounting hardware) as the axle maker specifies
- New wheel bearings and seals if you're reusing hubs (better to buy new hubs with the axle)
- Brake fluid of the type printed on the actuator or master cylinder, and new brake hose if the old one is cracked
Before you start
Most "axle problems" are actually bearing, hub or tire problems. Those have their own guides (wheel bearings, hub upgrade, tires). You replace the axle itself when:
- It's bent, from a curb strike, pothole, overload or a crash.
- The beam or spring seats are rusted through or badly scaled, common on older painted trailers that live in saltwater.
- A spindle is damaged, often after a bearing failure that overheated or scored it.
- You need more capacity or a different height, and the trailer maker confirms the rest of the trailer can take it.
This is usually a trailer-shop job. Measuring and ordering is something any owner can do; removing and installing involves a heavy load, rusted fasteners, brake lines and alignment. Many owners measure and order the axle themselves, then pay a shop to swap it.
Steps
Look for these signs:
- Uneven tire wear on the inside or outside edge of one or both tires. Discover Boating and EZ Loader both point to a bent or misaligned axle as a likely cause, and say to fix it before a tire fails.
- A wheel that leans in or out at the top when the trailer is loaded and parked on level ground.
- Lost camber. Dexter explains that axles are built with a slight upward bend ("camber") so they flatten out under load. An axle that sags downward in the middle when loaded may be bent or overloaded.
- Rust: deep pitting, flaking scale or holes in the beam or at the spring seats. Tap suspicious spots with a hammer; solid steel rings, rotten steel thuds or flakes away.
- Spindle damage: heat bluing, scoring or a bearing that won't stay adjusted.
If the axle is straight and solid and only the hubs or bearings are bad, see our hub upgrade guide instead.
Swapped or undersized axle? BoatUS's used-trailer checklist suggests comparing the axle tube's size with what the trailer's capacity plate calls for if you suspect a previous owner replaced the axle or it looks too small for the boat (bigger tubes carry more weight). Remember that the boat's weight has to fit within the gross rating minus the trailer's own weight. The same checklist says the suspension should leave at least four inches of ground clearance at the trailer's lowest point, and that rusty leaf springs (which usually go long before the frame) are a sign of age, not necessarily neglect, and simply need replacing.
- Dexter puts a nine-digit lot number on axles built after April 2001, near the center on the rear side of the beam under the word DEXTER. Wire-brush the area and rub chalk over it to make the numbers readable. Other brands have their own tags or stamps.
- Photograph the trailer's capacity plate (GVWR, tire size and pressure).
- With the lot number, an axle distributor can often look up the original build, which makes ordering much easier.
Dexter's measuring guide lists the key dimensions. Measure in inches, twice, with a helper holding the tape:
- Hub face: from the wheel-mounting surface of one hub to the wheel-mounting surface of the other. Not tire to tire or spindle tip to spindle tip.
- Spring center: from the center of one spring seat to the center of the other. This must match where the springs hang on your frame.
- Overhang: from the spring center to the hub face on each side.
- Track width if it's a dual-wheel setup.
Also write down:
- Leaf spring type (slipper or double-eye) and whether the axle sits over or under the springs.
- Straight or drop axle (a drop axle has the spindles set higher than the beam, which lowers the trailer).
- Wheel bolt pattern, wheel size and tire size.
- Brake type (none, surge drum, surge disc, electric-over-hydraulic) and whether the brakes sit on flanges welded to the beam.
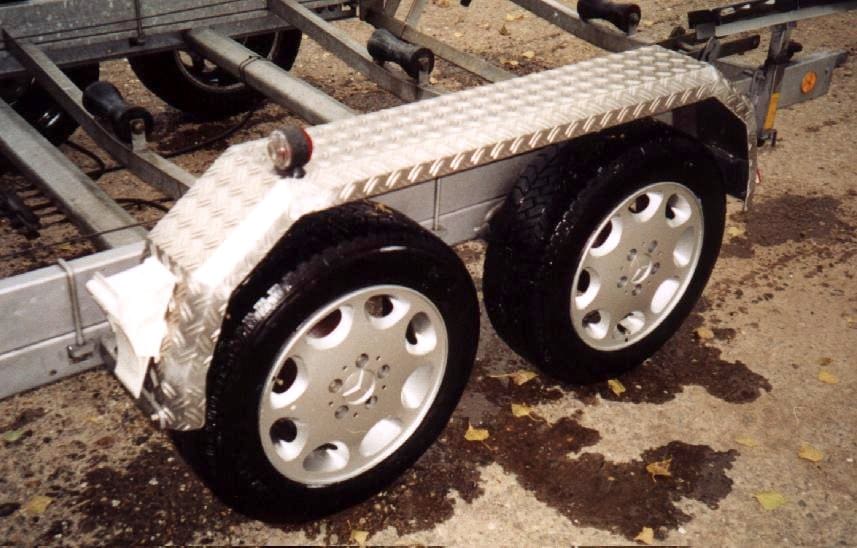
On tandem trailers, measure and inspect both axles; they usually share springs and equalizers. Photo: Wualex / Wikimedia Commons · Public domain - The new axle (or axles) should be rated for at least your loaded trailer weight minus the tongue weight. Our towing capacity guide shows how to weigh the rig.
- A bigger axle doesn't raise the trailer's rating by itself. The frame, springs, hangers, wheels, tires, coupler and the GVWR plate all set limits. If you want to carry a heavier boat, ask the trailer maker what the whole trailer can be upgraded to.
- Dexter notes that wheels and tires must also match each other and the load: the tire capacity can't exceed what the wheel is rated for.
- Straight leaf-spring axle: the most common on boat trailers. Simple, cheap and easy to service.
- Drop axle: lowers the trailer so the boat sits deeper at the ramp. Useful on shallow ramps; check ground clearance at driveway dips.
- Torsion axle (Dexter's Torflex is a common example): a steel bar wrapped in rubber cords inside the axle tube, bolted to the frame with brackets. Dexter lists a smoother, quieter ride, independent wheels and no spring shackles or hangers to wear out. Things to know:
- The start angle (which sets trailer height) is built in and can't be changed later.
- Dexter warns that welding on a Torflex bracket or tube can damage the rubber inside.
- Torsion axles aren't equalized like a leaf-spring tandem, so Dexter cautions that a bump or driveway lip can put a big share of the load on one axle for a moment.
- Dexter's Eliminator torsion axle has a removable spindle, so a damaged spindle can be replaced without a new axle.
Don't change mounting style just for height without advice: Dexter notes that moving springs from under to over the axle (or the reverse) changes frame height and the trailer's center of gravity, which can change how it tows. Our leaf spring guide covers that question.
Boat trailers get dunked, so order parts made for it:
- Finish: a galvanized beam is the usual choice for saltwater. Load Rite explains that hot-dip galvanizing coats the steel inside and out with a thick zinc layer that heals small scratches, far better than paint.
- Hubs: choose a system meant for immersion. Dexter says its E-Z Lube spindles are designed to allow immersion, while its NEV-R-LUBE sealed bearings are not designed for boat trailer use.
- Brakes: Dexter offers marine free-backing hydraulic brakes with E-coated, stainless or zinc-plated parts. BoatUS quotes a trailer shop owner who insists on stainless or galvanized brake parts rather than painted ones.
- Brake flanges: if you might add brakes later, order the axle with brake flanges. Dexter notes that about half of trailer builders skip flanges on idler axles, and without them you need a new axle beam to add brakes.
Dexter builds axles to order and sells mostly through distributors, which can supply complete assemblies quickly if they stock beams. Order the whole assembly (beam, spindles, hubs or hub-drums, brakes and hardware) rather than mixing old hubs and brakes onto a new beam; old parts are often why the axle failed. Give the supplier your measurements, lot number and photos.
- Take the boat off if at all possible. Working under a loaded trailer adds a lot of risk.
- Park on hard, level ground and chock the wheels on the axle you're not working on.
- Lift on the frame only and set rated jack stands under the frame on both sides.
- Soak U-bolt nuts, spring hardware and brake line fittings with penetrating oil the day before.
- Take photos of how everything is routed: brake lines, wiring, spring orientation, which way the U-bolt plates face.
In general terms:
- Remove the wheels.
- Disconnect the brake line or wires at each wheel (cap hydraulic lines so fluid doesn't drain and dirt doesn't get in).
- Support the axle with a second jack, remove the U-bolt nuts and plates (or the torsion bracket bolts), and lower the axle out.
- Inspect the springs, hangers, shackles and frame while they're exposed. Rusted springs or worn hangers should be replaced now (see our leaf spring guide).
- Lift the new axle into place, with the camber arched upward and the brake assemblies oriented the way the old ones were.
- Seat it on the spring center bolts (or bolt the torsion brackets to the frame).
- Install new U-bolts, plates and nuts as the axle maker specifies, and tighten them evenly, a little at a time, to the torque in the axle maker's manual.
- Square it: measure from the coupler (or a point on the tongue centerline) to the end of each spindle or hub face. The two measurements should match. On a tandem, also check that the axles are parallel. A crooked axle will chew tires and can make the trailer track off to one side.
- Hydraulic (surge or EOH): connect the lines, then bleed the system using the actuator maker's procedure and the brake fluid type printed on the reservoir. Our surge brake guide walks through checks.
- Electric drum brakes: connect the magnet wires as the brake maker shows. Dexter recommends a common ground wire run back to the plug rather than grounding each brake to the frame.
- Secure lines and wires so they can't rub on the springs or tires when the suspension moves.
- Mount the wheels with the right lug nuts for the wheel type (Dexter warns that mismatched cone nuts on stud-piloted wheels can lead to losing a wheel).
- Tighten lug nuts in a star pattern to the wheel maker's torque.
- Re-torque several times. Dexter explains that trailer wheels carry more load and flex more than car wheels, so nuts need re-torquing until they stabilize, especially on new wheels with paint at the mounting face. Follow your wheel or axle maker's schedule (usually after the first short drive and again after more miles).
- Lower the trailer, load the boat and do a slow test drive. Listen for rubbing, feel for the trailer pulling to one side, and test the brakes at low speed.
- Feel each hub after a few miles: similar temperatures are good; one much hotter than the others means a dragging brake or tight bearing.
- Check tire wear after a few hundred miles. Even wear means the axle is straight and square.
Common mistakes
- Replacing bearings over and over on a bent axle that keeps eating tires.
- Measuring tire to tire instead of hub face to hub face, and getting an axle that doesn't fit.
- Ordering a "heavier" axle and assuming the trailer can now carry a heavier boat.
- Ordering painted parts or sealed "never grease" bearings for a saltwater trailer.
- Reusing old stretched U-bolts or rusted hardware.
- Jacking on the axle tube or springs instead of the frame.
- Welding on a torsion axle.
- Skipping the lug nut re-torque after the first drive.
When to call a pro
- Any time you're not confident lifting and supporting the trailer safely
- Seized or rusted U-bolts, spring hangers or frame damage around the mounts
- Brake lines that need replacing or a system that won't bleed firm
- Converting from leaf springs to torsion, adding axles or brakes, or changing ride height
- The trailer still pulls or wears tires unevenly after the new axle is in
- You want a capacity upgrade: the trailer maker or a trailer shop should approve the whole package
Tips
- Odd measurements? Owners often find their hub face or spring center doesn't match any off-the-shelf axle. Call the trailer builder first with the trailer VIN; some still have the build records and can supply the right axle. Otherwise a distributor can build one to your exact dimensions. Avoid buying a "close enough" axle and welding on new spring seats yourself; spring seat position and welding quality are trailer-shop work.
- Measure while the old axle is still under the trailer and the springs are loaded the way they sit; it's easier to see where the spring centers are.
- Buy new hubs, bearings and seals with the axle so everything starts fresh and matched.
- Ask the shop to give you the old axle's tag and any removed parts; they help if you ever need to reorder.
- While the trailer is apart, it's a good time to replace cracked bunks, rusty springs and old tires.
Official references
We read these to write this guide. Your engine's own manual always wins.
- Dexter – How to Measure an Axle for Proper Trailer Fit
- Dexter – FAQs, Axles (lot number, camber, Torflex)
- Dexter – FAQs, General (jacking, over/under conversion, wheel re-torque, E-Z Lube)
- Dexter – Torsion Axles (Torflex and Eliminator)
- Dexter – Grease and Oil Caps (which hub systems tolerate immersion)
- Dexter – FAQs, Brakes (brake flanges on idler axles, marine hydraulic brakes)
- Load Rite Trailers – FAQs (hot-dip galvanizing)
- Discover Boating – Boat Trailer Maintenance (uneven tire wear and bent axles)
- EZ Loader – FAQ (tire wear from a bent axle)
- BoatUS – Brakes 101, Trailering Maintenance (galvanized and stainless parts in saltwater)
- BoatUS – Buying A Used Trailer (2015)
Safety: BoatMend is for information only and does not replace a certified marine technician. You are responsible for your safety and your boat. Read the full disclaimer.
Last updated 2026-10-25
Related guides
How to Inspect Boat Trailer Axles, Leaf Springs and Hangers
Check the parts that actually hold your boat off the road: the axle tube, leaf springs, hangers, shackles, bushings and U-bolts (or the rubber torsion axle on newer trailers). Learn what rust-through, broken leaves and worn shackles look like, how uneven tire wear points to a bent axle, and when it's time to replace instead of patch.
Upgrading Boat Trailer Hubs: Grease-Through Spindles, Oil Bath, Protectors and Pre-Packed Kits
Choose the right hub setup for how you use your trailer, swap in a pre-packed hub kit, adjust it correctly and know when the axle itself is the real problem. Better hubs mean fewer roadside bearing failures and less time with greasy hands.
How to Inspect and Repack Boat Trailer Wheel Bearings
Check, clean and repack your trailer's wheel bearings so a seized hub does not leave you stranded on the highway. Boat trailers get dunked in water every launch, which makes their bearings fail far more often than those on dry utility trailers.
How to Check and Care for Boat Trailer Surge Brakes
Understand how the hydraulic surge brakes on your boat trailer work, check the fluid, use the reverse lockout correctly and rinse salt out of them after every dunk. Simple habits that keep the brakes from seizing, dragging or failing when you need them.
Electric-Over-Hydraulic and Electric Trailer Brakes: Controller Setup, Breakaway and Care
Why most boat trailers use surge or electric-over-hydraulic (EOH) brakes instead of plain electric drums, how to pick a compatible in-cab brake controller and set its gain, how to test the breakaway switch and battery, and how to keep the system working around saltwater.
How to Inspect, Inflate and Replace Boat Trailer Tires
Check your trailer tires the way the pros do: the right type (ST), the right load range, the right cold pressure, and an honest look at their age. Tires are the number one reason boat trailers end up on the side of the highway.

Is My Vehicle Rated to Tow This Boat? Towing Capacity, GCWR and Tongue Weight Explained
The towing number in the ad is only one of several limits. Learn which ratings matter (towing capacity, GCWR, GVWR, axle and tongue limits, hitch class and ball rating), how to weigh your real rig at a truck scale, and when you need trailer brakes and towing mirrors.