How to Maintain Your Boat's Air Conditioning Seawater System
Keep seawater flowing through your marine A/C by cleaning the strainer, checking the pump and overboard discharge, descaling the condenser coil when flow drops, cleaning the air filter, and winterizing the seawater circuit before a freeze. Most "A/C not cooling" calls are a water-flow problem.
Time
1 h 30 min
Shop would charge
$200-600
Applies to
All engines · Cabin cruiser, Yacht, Sailboat
Safety first: The A/C seawater intake is a hole in the hull below the waterline. If the boat is in the water, close the seacock before opening the strainer or disconnecting any hose, and never remove a hose from a below-waterline through-hull while afloat. Turn the A/C off at the breaker before working on the unit: it runs on 120 V or 240 V AC shore or generator power. If water is coming in faster than you can stop it, run the bilge pumps and call USCG on VHF 16 or 911.
Owners often ask
- My boat's air conditioner stopped cooling and barely any water comes out the side. What do I check?
- Do I need to winterize the A/C on my boat, and what antifreeze do I use?
This guide walks you through it. Still stuck? Ask the AI Mechanic about your engine.
Tools
- Flashlight
- Screwdrivers and nut drivers for hose clamps and access panels
- Bucket, rags and a small brush
- Shop vacuum with a brush attachment
- Thermometer (an inexpensive probe or infrared type)
- For descaling or winterizing - a bucket and small pump kit (or the A/C maker's flush kit) and hoses that fit your system
Parts & supplies
- Marine A/C descaler made for your condenser material (follow the A/C maker's recommendation)
- Propylene glycol (non-toxic) antifreeze for winterizing, in the strength your A/C manual specifies
- Replacement strainer lid gasket and stainless hose clamps (if needed)
- Replacement return-air filter (if yours is disposable)
Before you start
How it works: a typical marine A/C moves heat from the cabin into seawater. Seawater comes in through a through-hull and seacock, passes a strainer, is pushed by a seawater pump through the condenser coil inside the A/C unit, and goes back overboard through a discharge fitting you can usually see on the hull. One pump may serve several A/C units. Inside the cabin, a fan pulls air through a return-air filter and across the cold evaporator coil.
Why flow matters: if seawater can't carry heat away, the unit can't cool, and many units shut down on a high-pressure fault (the code shown depends on the brand). Weeds, shells and mineral scale are the usual reasons.
Typical schedule (confirm in your A/C manual):
- Strainer: look at it every time you use the boat in summer; clean it whenever there is growth. A Soundings contributor cleans his weekly, another every couple of weeks.
- Return-air filter: clean it monthly in season.
- Condenser coil descaling: when flow drops and a clean strainer doesn't fix it, or on a schedule in warm salt water (a yacht captain quoted by Soundings descales twice a year; others go 18 months or more).
- Winterizing: before any freeze, if the boat stays in a cold climate.
Find the manual for your unit by model on the maker's site (Dometic/Cruisair/Marine Air, Webasto and others). Hose routing and pump types vary a lot between boats.
Steps
With a flashlight, trace the A/C seawater circuit: the intake seacock, the strainer, the pump, the hoses to each A/C unit and the overboard discharge fitting on the hull. Photograph each part and note it in your BoatMend boat profile.
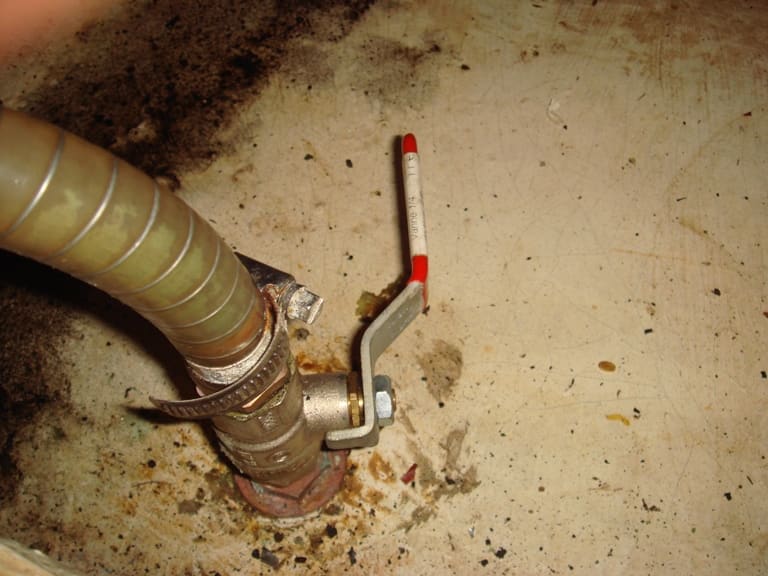
Photo: PHGCOM / Wikimedia Commons · CC BY-SA 3.0 An intake valve with its hose. The handle here is turned across the hose, which means closed; in line with the hose means open.
With the A/C running, look at the discharge on the outside of the hull. You should see a steady stream. Learn what normal looks like when everything is clean so you notice when it gets weak. A trickle or no water means a flow problem: go to the strainer first.
Turn the A/C off. Close the intake seacock and open it again. Dometic's maintenance advice includes checking that the handle actually shuts off the water. A seacock that won't move or won't close needs attention at the next haul-out.
With the A/C off and the seacock closed, open the strainer lid, lift out the basket and clean out weeds, shells and growth. Rinse it, check the lid gasket for cracks or flattening, and reassemble firmly. Open the seacock again.
Many A/C seawater pumps are centrifugal and not self-priming: if air gets in when you open the strainer, the pump spins without moving water. After reassembling, Dometic says to prime the system to avoid air locks. Usually that means letting water fill the strainer and pump before starting (some installations have a vent or need the strainer lid loosened briefly); check your manual. Restart and confirm good flow overboard.
With the system running, look for leaks at the pump, fittings, hoses and the pump's shaft seal. The pump should run smoothly without getting very hot. Dometic's checklist also includes examining the pump's impeller; on pumps where it can be reached, follow your pump manual to inspect it with the A/C off and the seacock closed, and replace it if vanes are cracked or missing. Hoses below the waterline should have stainless clamps and no cracks or soft spots. If several A/C units share one pump, turn each unit on alone and confirm each can start the pump by itself.
Look at the unit in its cabinet. Dometic suggests checking for oil spots (a sign of refrigerant oil leaking), seawater corrosion, standing water in the condensate drain pan, damaged copper tubing or insulation, and loose wiring or bonding connections. Pour a little water into the drain pan to confirm it drains away; a blocked condensate drain makes mold and water damage below.
Remove the filter behind the return-air grille. Vacuum it, or rinse it in the direction opposite to the airflow, then let it dry completely before refitting. Vacuum dust from the evaporator fins gently with a soft brush; don't bend them. While you're there, look at the ductwork for crushed or tightly kinked sections, and check that the insulation around the ducts is intact; bare duct "sweats" and drips condensation into lockers and headliners.
Measure the air temperature going into the return grille and coming out of a supply vent in cooling mode. A Soundings contributor says a difference of roughly 15 to 20°F is normal. Much less suggests low refrigerant or a flow problem; much more can mean a clogged evaporator. If you have reverse-cycle heat, switch to heat for a minute to exercise the reversing valve.
Check the controller too, as Dometic suggests: the room temperature it displays should be close to your thermometer's reading, and the unit should stop cooling (or heating) once the cabin reaches the set point. A unit that never shuts off, or short-cycles on and off, may have a sensor or control problem for a technician.
If the strainer is clean and primed but overboard flow is still weak, scale and growth are probably restricting the condenser coil. Owners commonly use a marine A/C descaler pumped in a loop from a bucket through the seawater circuit with a small pump kit:
- With the seacock closed, connect the kit at the point your A/C maker specifies (often at the strainer or pump inlet), and route the discharge back to the bucket, not overboard.
- Circulate the descaler for the time on its label, watching for debris coming back into the bucket.
- Flush with fresh water, reconnect all hoses with good clamps, open the seacock, and check flow. Use only a product made for your condenser's material (copper-nickel or titanium), and follow both the descaler label and your A/C manual. Some pros use acid solutions; BoatTEST recommends leaving those to a technician because of the handling and legal disposal.
Water trapped in the condenser, pump or low spots can freeze and burst them. West Marine explains the common method, and says to follow your A/C maker's procedure first:
- With the seacock closed, introduce a non-toxic propylene glycol antifreeze solution at the point your manual specifies. Dometic's procedure for its seawater pumps disconnects the hose at the strainer outlet and keeps it raised so the pump stays primed.
- Run the pump until undiluted antifreeze comes out (Dometic's endpoint for some systems), and collect what comes out instead of letting it go overboard or onto the ground.
- Drain the strainer and the hose between strainer and seacock if your manual says to. Some pumps (for example certain Dometic magnetic-drive pumps) have an impeller that should be removed and stored for winter.
- Never use automotive ethylene glycol antifreeze. Some makers also allow blowing the circuit out with low-pressure air; use only the pressure your manual allows, since too much can damage parts and air can leave water in low spots.
Reinstall anything you removed, reconnect hoses, open the seacock, check for leaks and confirm steady overboard flow before running the A/C normally. Flush out leftover antifreeze into a container and dispose of it properly.
Common mistakes
- Opening the strainer with the seacock open while afloat.
- Forgetting to prime the pump after cleaning the strainer, then assuming the pump has failed.
- Replacing the pump first when the real problem is a clogged strainer or a scaled condenser.
- Running the A/C with the seacock closed. No water flow can trip the unit or damage the pump.
- Forgetting the A/C when winterizing the engine and fresh water system, and finding a cracked condenser in spring.
- Using car antifreeze, which is toxic, instead of propylene glycol.
- Antifreeze taking the shortest path: with several units on one pump, check that each unit's discharge shows antifreeze.
When to call a pro
- The unit cools poorly with good water flow, shows oily spots, or the compressor sounds wrong (possible refrigerant problem: refrigerant work requires a certified technician)
- It trips the shore-power or generator breaker, or you smell burning or see scorched wiring
- A seacock is stuck or leaks, or any below-waterline hose or fitting needs replacing (haul-out job)
- You want acid descaling or can't find where to connect a flush kit
- Mold or musty smells in the ductwork
- Water is entering the boat: close the seacock if you can, run the bilge pumps, and call USCG on VHF 16 or 911
Tips
- Label the A/C seacock handle and strainer so anyone aboard can find and close them fast.
- A clear-top strainer lets you check for weed without opening it.
- In warm, weedy harbors, check the strainer more often in late summer when growth peaks.
- Write down the normal discharge stream and temperatures in your BoatMend log so you can spot changes early.
Official references
We read these to write this guide. Your engine's own manual always wins.
Safety: BoatMend is for information only and does not replace a certified marine technician. You are responsible for your safety and your boat. Read the full disclaimer.
Last updated 2026-10-24
Related guides
How to Inspect and Exercise Seacocks, Through-Hulls and Hose Clamps
Check every hole in your hull below the waterline, work each seacock open and closed, and inspect the hoses and clamps attached to them. A single failed fitting or hose is one of the most common reasons boats sink at the dock.
Shore Power Safety: Cords, Inlets, Burned Plugs and Electric Shock Drowning
An owner's inspection routine for your shore power cord, plugs, boat inlet, galvanic isolator and ground-fault protection, plus the right way to plug in and the facts about Electric Shock Drowning. This guide is for looking and testing only; any electrical repair belongs to an ABYC-certified marine electrician.
Marine Generator Routine Maintenance and CO Safety
Keep an Onan, Kohler/Rehlko, Northern Lights, Westerbeke or similar marine generator reliable with regular checks of oil, raw-water cooling, fuel, exhaust and the start battery, plus a monthly run under load. Generator exhaust is a leading source of carbon monoxide on boats, so safety checks come first.
How to Prevent and Remove Mold and Mildew on Your Boat
Stop the musty smell and black spots before they start. Find and fix the water source, keep air moving, control humidity safely, and clean mold off gelcoat, vinyl and cabin surfaces with products that won't damage them.
How to Winterize (and Recommission) Your Boat's Freshwater System
Protect the tank, pump, water heater, faucets and showers from freeze damage with non-toxic antifreeze, then flush and sanitize everything in the spring so the water is clean again. A cracked pump or split fitting is a common, avoidable winter repair bill.