Trim Leaks: When the Motor or Drive Won't Stay Up
Track down why your outboard or sterndrive slowly sinks, trails down on the trailer or leaks trim fluid. Work from the free checks (release valve, fluid level) to hoses, ram seals and internal leaks, and learn when a rebuild or a new cylinder makes more sense.
Time
1 h
Shop would charge
$200-1500
Applies to
Sterndrive (I/O), Outboard
Safety first: A motor or drive that "won't stay up" can drop without warning. Never put your hands, head or body under it unless it is held by the tilt support lever, a solid block or a proper support, not by the hydraulics. Trim systems hold fluid under high pressure: never loosen a hose or fitting while the motor or drive is raised, and keep skin away from any pinhole spray. Hydraulic fluid injected under the skin is a medical emergency (call 911).
Owners often ask
- My sterndrive (or outboard) slowly drops when the boat sits on the trailer. Is it the trim cylinders?
- Trim fluid is leaking from the hose going to my trim cylinder. Can I replace the hose myself?
This guide walks you through it. Still stuck? Ask the AI Mechanic about your engine.
Tools
- Flashlight and an inspection mirror
- Clean rags, paper towels and a small drain pan
- Masking tape and a marker (to measure creep)
- Wrenches that fit the hose fittings (only if you replace a hose)
- Blocks, a tilt support lever or a proper motor or drive support
- Safety glasses and nitrile gloves
Parts & supplies
- Power trim fluid specified in your owner's manual
- Replacement hose, O-rings or seal kit for your exact model (only after you find the leak)
- Marine grease (for the ram tips)
Before you start
How it works: a small electric pump pushes fluid through hoses or internal passages into rams (cylinders). On most outboards the pump, reservoir and rams are one unit between the clamp brackets. On most sterndrives the pump sits inside the boat and hoses carry fluid out through the transom to two trim cylinders on the sides of the drive. Check valves inside the pump are supposed to lock the fluid in place when the pump stops.
What the symptom tells you:
- Fluid on the outside and the level keeps dropping: an external leak (hose, fitting, ram seal, fill plug or release valve).
- The motor creeps down but nothing is wet and the level stays the same: an internal leak (check valves in the pump or a piston seal inside a cylinder). That is usually a shop repair.
- Nothing happens when you press the switch: start with the electrical checks in our trim fluid guide instead.
Do this first: read the fluid check in our trim and tilt fluid guide (linked under related guides). Hydraulic fluid does not evaporate, so if you have been topping up, there is a leak somewhere.
Steps
Tilt the motor or drive fully up with the battery switch on, then put a strip of masking tape on the ram (or on the drive and transom) and mark the position. Check again after a few hours or the next morning. Note how far it moved. This gives you a baseline, so you will know later whether a repair actually worked.
Also note when it happens: overnight on the trailer, under way (the motor "trims itself down"), or only when you back off the throttle or shift into reverse.
Most outboards and many sterndrive trim pumps have a manual release valve so you can raise or lower the motor by hand. If someone left it a turn open, or it vibrated loose, the motor will sink and may kick up in reverse. With the motor down or supported, turn it clockwise until snug. Do not force it; it is a small part threaded into the pump body.
If closing it fixes the creep, you are done. If fluid weeps from around the valve, its O-rings may be worn; that is a small repair, but the valve should be removed only with the motor down and supported.
Check the reservoir in the position your manual specifies and top up only with the fluid it names. Mercury's FAQ, for example, names its own power trim and steering fluid for MerCruiser trim systems; other brands specify different fluids. Look at the fluid on a clean rag:
- Clear and clean: carry on looking for the leak.
- Milky: water is getting in, often through a failed seal or a loose fill cap. The unit needs draining, refilling and the entry point found.
- Dark with metal flakes: pump wear. See a pro.
Old grime hides the real leak. Wipe the trim unit, hoses, fittings and rams dry. Then cycle the trim fully up and down a few times, support the motor, and look again with a flashlight and mirror. Fresh fluid shows up as a clean wet line. A paper towel pressed against each fitting tells you which one is weeping.
Make sure it is trim fluid. On a sterndrive, gear lube from a leaking drive seal can end up on the same parts but has a strong sulfur smell. Power steering fluid can drip from the steering actuator nearby.
Follow each trim hose from the pump to the cylinders. Look for:
- Cracks, bulges or chafe marks where a hose rubs the transom, the hull or a clamp
- Rust swelling at crimped hose ends, which is a common weak point on older boats in salt water
- Wet fittings where the hose screws into the pump or the cylinder (often a tired O-ring)
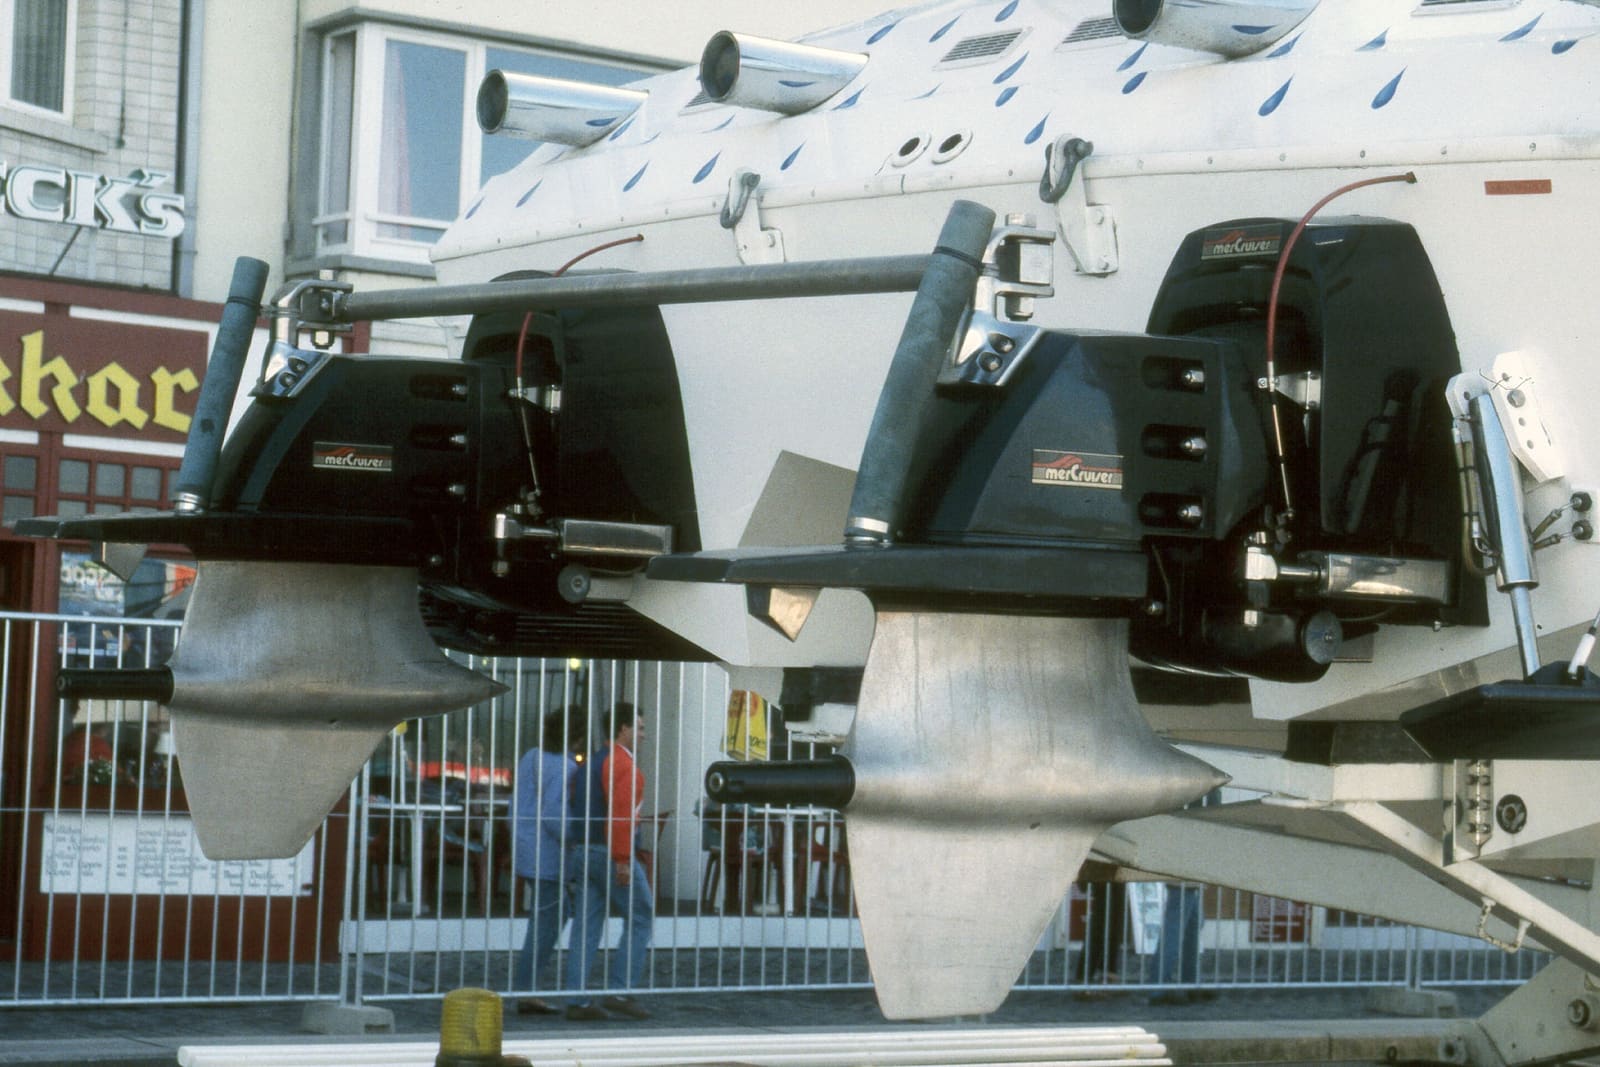
Every hose end, fitting and polished ram like these is a place to look for a fresh wet line. Photo: Rennbootarchiv / Wikimedia Commons · CC BY-SA 3.0 DE On many sterndrives the hoses pass through the transom assembly. Hoses on the outside of the boat can often be replaced by a careful owner; hoses that run through the transom assembly may need the drive or other parts removed, which is a job for a shop or an experienced owner with the service manual.
Tilt up, support the motor, and look at the shiny rams where they enter the cylinders. Fluid collecting at the seal, or a wet ring of dirt, means the seal is leaking. Now look closely at the ram itself.
BoatUS points out that seals fail either from age and sun or because the ram is pitted or corroded. A seal kit alone can fix an old, sun-cracked seal. If the ram is pitted, the rough spots will chew up new seals, so the ram and seals need replacing together.
Look at both cylinders on the sides of the drive: the anchor pins at each end, the cylinder bodies and the rubber boots or caps if your drive has them. Heavy white corrosion around the ends, a bent ram or a cylinder that is wet at the base all point to a cylinder that needs rebuilding or replacing. Both cylinders usually work as a pair; a shop may recommend doing both at once.
If nothing is wet, the fluid level is steady, the release valve is closed and the motor still creeps down, the leak is inside. The usual suspects are check valves in the pump or a piston seal that lets fluid slip past inside a cylinder. Yamaha's advice for this exact symptom is to have the seals and valves inspected by a dealer.
Shops use leak-down tests (isolating each ram or line) to find out which part is bypassing. That involves opening the hydraulic system, so leave it to them unless you have the service manual and the right fittings.
A motor or drive that drops on the trailer is not always a failed part. Bumps load the rams hard, and a slow internal leak shows up there first. Yamaha says the built-in tilt lock is for storage and mooring only, not for trailering. Use the trailering position and support your owner's manual describes (for many outboards, a transom saver or motor support). Never rely on a leaking trim system to hold the motor up on the highway; our trailering prep guide covers the full pre-tow check.
- Slow external weep, fluid clean: you can usually keep using the boat while you order parts. Check the level before each trip and carry a bottle of the right fluid.
- Fast leak or fluid spraying: stop using the trim. Lower the motor or drive and leave it down until repaired.
- Motor kicks up in reverse: do not run it. Without hydraulic lock, reverse thrust can push the motor up and out of the water, and you lose steering and stopping power.
Only on a hose you can reach without removing the drive:
- Lower the motor or drive fully, turn off the battery switch and remove the reservoir cap slowly to release pressure.
- Put rags and a drain pan under the fitting. Undo it slowly; some fluid will come out.
- Fit the new hose or O-ring for your exact model. Do not use generic hose; trim hoses are rated for the system pressure.
- Top up, cycle the trim fully several times to purge air, and recheck the level as your manual describes.
- Seal kit (rebuild): makes sense when the ram is smooth and only the seals are old. Generic kits do not always include every seal; match the kit to your service manual's parts diagram.
- New ram or cylinder: needed when the ram is pitted, bent or badly corroded. Depending on the model, a complete new cylinder can cost little more than the labor to rebuild the old one, so ask for both prices.
- Pump repair or replacement: for internal leaks or a worn pump. BoatUS notes this is usually removal and replacement, or a rebuild by a qualified shop.
After any repair, cycle the trim, recheck the fluid, then repeat the tape test from step 1 overnight. Test on the water too (with cooling water and the release valve closed): the motor should hold its trim under power and not kick up when you back off the throttle. Wipe a light coat of marine grease on the exposed ram tips and store the boat with the rams retracted, as Yamaha recommends, so the polished surface stays inside the fluid.
Common mistakes
- Topping up the reservoir every weekend without ever finding the leak. Fluid does not evaporate.
- Putting new seals on a pitted ram. The leak comes back within weeks.
- Loosening a hose fitting with the motor raised. The motor can drop and fluid can spray out under pressure.
- Using whatever fluid is on the shelf. Mixing the wrong fluid can damage seals; use only what your manual names. Yamaha specifically warns never to substitute motor oil or automotive power steering fluid: trim fluid is made to handle very high pressure, some water and foaming.
- Ignoring squeaks and pops when the motor tilts. Yamaha says greasing the top of the trim rams now and then stops the noise and keeps corrosion off.
- Trailering on the tilt lock lever, or trusting a creeping trim system to hold the motor up on the road.
- Blaming the trim for a drip that is actually gear lube or power steering fluid. Smell and color tell them apart.
- Assuming a "won't stay up" motor is a bad pump before checking the manual release valve.
When to call a pro
- The motor or drive creeps down with no visible leak (internal leak in the pump or a cylinder)
- A ram is pitted, bent or heavily corroded, or a cylinder is cracked
- The hose that leaks runs through the transom assembly or needs the drive removed
- The fluid is milky, dark or full of metal flakes
- The motor kicks up in reverse even with the release valve closed
- The release valve is stripped, broken or will not stay closed
- The system needs a factory bleeding procedure after repair
Tips
- Tape-and-marker tests beat guessing. Write the date and how far it moved in your BoatMend log.
- Rinse the trim unit and rams with fresh water after every saltwater trip; corrosion pits rams and ruins seals.
- Retract the rams fully for storage (support the motor with the tilt lock or an engine support if it must stay up).
- When you call a shop, describe the symptom exactly: "drops about an inch overnight, nothing wet, fluid level steady" points them straight at an internal leak.
- Keep a spare bottle of the correct trim fluid aboard, as Mercury suggests in its list of spares.
Official references
We read these to write this guide. Your engine's own manual always wins.
Safety: BoatMend is for information only and does not replace a certified marine technician. You are responsible for your safety and your boat. Read the full disclaimer.
Last updated 2026-10-24
Related guides
How to Check and Top Up Power Trim and Tilt Fluid
Check and top up the hydraulic fluid in your power trim and tilt unit, then work through the simple checks when the motor won't go up, won't go down or slowly sinks. Most trim problems are a dead battery, a bad relay, low fluid or a release valve left open, and you can find those yourself.
How to Inspect Sterndrive Bellows, Gimbal Bearing, U-Joints and Shift Cable
Learn to spot a cracked sterndrive bellows before it lets water into the boat, and to recognize the warning signs of a worn gimbal bearing, U-joints and shift cable. A failed bellows is one of the top reasons boats sink at the dock, and a 20-minute inspection can catch it.
How to Grease Your Outboard's Lubrication Points
Grease the swivel bracket, tilt tube, steering and shift linkages, trim rams and prop shaft splines on your outboard. Grease keeps salt and water out of the moving joints. A 30-minute job once or twice a season prevents seized steering, stuck props and corroded brackets.

Get Your Boat Ready for the Road: Pre-Trailering Checklist
Most trailering trouble starts in the driveway: an engine left without support, a loose strap, a cover that balloons at 60 mph, gear that blows out or tongue weight that makes the rig sway. Work through this checklist before every trip and do a quick walkaround at each stop.
How to Remove and Reinstall an Outboard Gearcase (Lower Unit) Without Losing Shift
Dropping the lower unit is the first step of every outboard water pump job, and the reinstall is where most DIY trouble starts: no forward gear, no cooling water or a driveshaft that will not seat. Learn how to set the shift position, protect the water tube, line up the splines and test everything before the boat goes back in the water.