How to Clean, Protect and Inspect Stainless Steel Boat Hardware
Remove tea stains and rust from rails, cleats and fittings without scratching them, passivate stainless so it stays clean longer, understand why 304 and 316 behave differently, and spot the hidden crevice corrosion that weakens fittings from underneath.
Time
2 h
Shop would charge
$150-600
Applies to
All engines
Safety first: Rust removers and passivating products are acids. Wear gloves and eye protection, keep them off your skin, and never mix them with bleach or other cleaners. Rinse thoroughly, because acid left on gelcoat, paint or aluminum can damage it. Rust at the base of chainplates, stanchions, tower or bimini mounts, or lifting points can mean the fitting is weaker than it looks. Don't trust it to hold a person or a load until it has been inspected.
Owners often ask
- Why is my stainless steel rail rusting if it's supposed to be marine grade?
- How do I get brown rust stains off stainless cleats and rails?
This guide walks you through it. Still stuck? Ask the AI Mechanic about your engine.
Tools
- Garden hose and buckets
- Soft cloths, microfiber towels and an old toothbrush
- Non-scratch nylon scrub pads (never steel wool)
- Nitrile gloves and safety glasses
- Painter's tape and plastic sheeting to protect gelcoat and canvas
- Magnifying glass and a flashlight
Parts & supplies
- Mild boat soap
- Stainless steel cleaner or rust-stain remover for marine use (paste or gel preferred)
- Citric acid-based passivating product for stainless steel
- Stainless metal polish (optional, for a shine)
- Marine sealant for rebedding fittings, if needed
Before you start
Stainless is corrosion-resistant, not corrosion-proof. It stays shiny because chromium forms a thin, invisible oxide layer on the surface. That layer repairs itself as long as the metal gets oxygen. Take the oxygen away (trapped, stagnant water) or contaminate the surface with plain steel, and it starts to rust.
304 vs 316:
- 304 (also sold as 18-8): common, cheaper, and the alloy used for most ordinary screws, bolts and nuts. It tea-stains readily near salt water.
- 316 ("marine grade"): adds about 2–3 percent molybdenum, which makes it much better in salt. Practical Sailor points out that your stanchions may be 316 while the bolts holding them are 18-8.
- ASSDA, the Australian stainless steel association, notes that even 316 isn't truly seawater-proof. It will still rust in crevices, under deposits and where salt spray builds up and isn't washed off.
Tea staining vs real damage: light brown surface staining is mostly cosmetic and cleans off. Rust bleeding from under a fitting, pitting (tiny holes), or cracks are not cosmetic. They can mean corrosion inside the hole or under the base.
How often: rinse stainless with fresh water after every salt-water trip, wash it with soap regularly, and do a deeper clean, passivate and inspect once or twice a season. Typical; more often in hot, salty climates.
Steps
Rinse all stainless with fresh water to dissolve salt. Then wash it with mild boat soap and a soft cloth or brush, and rinse again. Salt holds moisture against the metal, so regular washing prevents most staining. ASSDA notes that just wiping with a damp cloth smears salt around instead of removing it. Dry with a towel to avoid water spots.
Never use steel wool, wire brushes or ordinary scouring pads on stainless. Tiny bits of plain steel get embedded in the surface and rust, leaving new orange spots within days. Use soft cloths, nylon pads or a toothbrush. Clean tools that have touched carbon steel before using them on stainless.
Practical Sailor warns that chlorine cleaners are highly corrosive to stainless. Keep bleach-based cleaners, chloride cleaners and anything containing hydrochloric (muriatic) acid away from stainless fittings, and rinse well if they splash on.
Before using any rust remover, tape off nearby gelcoat, paint and wood, and cover canvas and vinyl. Acids can etch or dull gelcoat, stain fabric and attack aluminum. Work in the shade so products don't dry on the surface.
Apply a stainless or rust-stain cleaner made for boats. Practical Sailor's testing found the most effective rust-stain removers usually contain phosphoric or oxalic acid. It prefers pastes and gels because they're easier to control than runny liquids. Follow the label for dwell time, work it in with a nylon pad or toothbrush (along the grain of brushed finishes), then rinse thoroughly with lots of fresh water. Repeat rather than scrubbing harder.
Polishing makes stainless shiny, but passivating helps it stay that way. A passivating product dissolves free iron from the surface so a fresh, strong oxide layer can form. Practical Sailor tested citric acid-based passivating products and found them effective and much safer than the nitric acid used in industry. Apply the product as directed, let it work for the time on the label, then rinse very thoroughly. Don't leave it on longer than directed or mix your own strong acid. Passivating is especially worth doing on welds and on cut or drilled areas, where rust often starts.
Once clean and rinsed, a stainless metal polish brightens the finish and can leave a light protective film. Rub along the direction of any polish lines. Polishing is cosmetic. Don't let a shine hide pitting or cracks you should be inspecting.
With a flashlight and magnifying glass, check:
- Welds on rails, towers and bimini frames
- Where tubes enter fittings and bases
- Chainplates, stanchion bases, cleats, lifting eyes, ladder mounts, and swaged rigging terminals (sailboats)
Look for pits, hairline cracks, rust weeping from a joint, or swelling. Practical Sailor notes that polishing can wipe away the warning signs of a fitting that's about to fail. Inspect before you polish.
A surveyor's corrosion article for BoatUS adds what to look for: stress cracks in formed fittings (swaged terminals, bent brackets) branch out like a leafless tree and can fail with no other warning, yet you can usually find them with a magnifier; rust on a bow pulpit can start at tiny cracks from flexing; and rust staining on a valve handle is a warning that it may break off when you need to close the valve in an emergency. It also lists stainless swim-platform brackets and ladder bolts rusting because the platform's wood core got soaked through the fastener holes, the same trapped-water problem as step 9.
Rust stains spreading from under the base of a fitting, or from its screws, usually mean crevice corrosion. Water gets trapped under the flange or in the bolt holes, runs out of oxygen, and the stainless turns active and corrodes. BoatTest notes this often happens where hardware was bedded only around the fasteners, not under the whole base. The part you can't see, inside the deck, often looks worse than the part you can. Cruising World says chainplate and padeye bolts are especially at risk. A surveyor writing for BoatUS explains why: most decks have a wood or foam core, and once the sealant around a fitting fails, the wet core holds water against the bolts like a sponge. Those rust blobs under the deck usually mean a leak, not cheap bolts, and a brown "blush" around a fitting's base is more often water getting under it than harmless salt staining.
A fitting that keeps weeping rust needs to come off. Remove it, clean and inspect the base and bolts, and replace any bolts that are pitted, thinned or cracked. Cruising World recommends bedding the entire base in sealant, not just the bolt holes, so water can't collect underneath. It also notes that bedding compounds have a finite life (roughly five to seven years is mentioned). Follow the
deck-hardware-rebeddingguide. Use 316 fasteners where they're exposed to salt.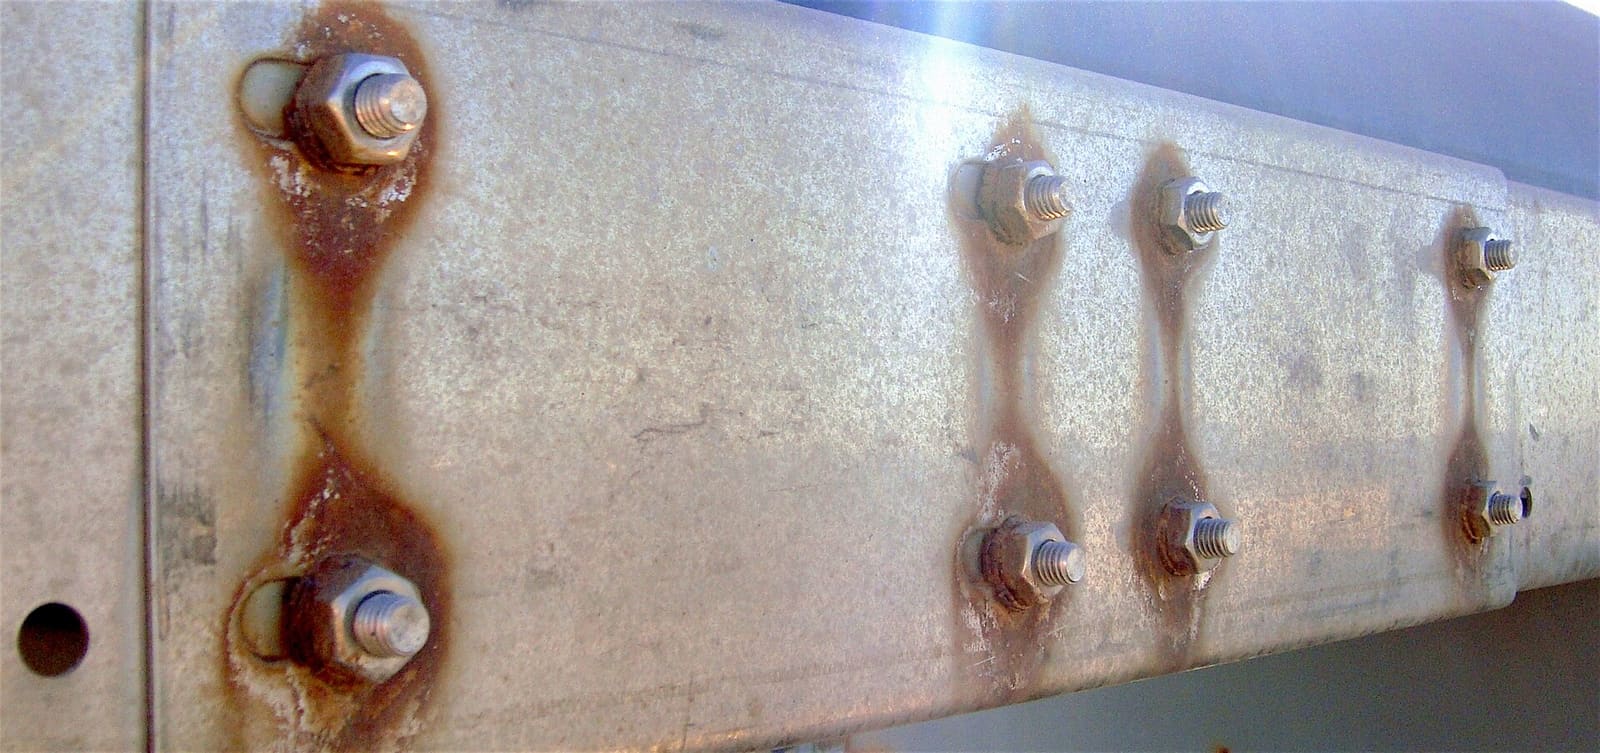
Rust running from mismatched bolts: mixing metals, or using plain steel fasteners in stainless parts, leaves streaks like these. Photo: D3j4vu / Wikimedia Commons · CC BY-SA 3.0 Never use plain or zinc-plated steel screws in stainless fittings. They rust and stain everything around them. Practical Sailor also notes that pairing stainless with other metals, or even a different stainless alloy, can cause staining and pitting. When replacing fasteners, match the alloy, and ideally use 316 on deck.
Tape, rubber sleeves and plastic covers on stainless rigging or rails trap moisture against the metal and hide corrosion. Cruising World advises avoiding them where you can. If you must use them, remove them periodically to dry, clean and inspect underneath.
Rinse after every trip, wash weekly in salt water, and repeat the clean and passivate when tea stains come back. Log inspection dates and any fittings you're watching in BoatMend.
Common mistakes
- Steel wool or a wire brush. It plants steel particles that rust and make things worse.
- Bleach and chlorine cleaners on or near stainless. They're highly corrosive to it.
- Leaving acid cleaners on gelcoat. It can dull or etch the finish. Tape off and rinse well.
- Polishing over pits and cracks. It hides damage on parts that carry loads.
- Bedding only the bolt holes. Water collects under the flange and corrodes it from below.
- Assuming "316" means "never rusts." It still needs washing, and the bolts may be 304.
- Cutting stainless with a grinder or abrasive wheel. The heat and steel particles leave rust-prone spots; passivate afterward.
When to call a pro
- Cracks, deep pitting or rust weeping from chainplates, rigging terminals, stanchion bases, tower or ladder mounts, or lifting eyes
- A fitting that moves, or a deck that feels soft around hardware (possible water in the core)
- Heavily pitted rails or tower tubes, which may need professional repolishing or replacement
- Any welded repair. Welding stainless properly and passivating afterward is a fabricator's job
- Hardware that supports people or rigging and you're unsure of its condition
Tips
- A quick freshwater rinse after every salt trip is the best stainless care there is.
- Keep a nylon pad and a small tube of stainless cleaner on board for spots.
- Check fittings after a heavy rain: fresh rust streaks show you where water is getting trapped.
- When buying replacement hardware, ask for 316 and matching 316 fasteners.
- Take a small magnet shopping. BoatUS notes that 300-series stainless is nonmagnetic or very nearly so; a part that grabs the magnet hard isn't what you want on deck. Test hose clamps' screws as well as the bands, because some "stainless" clamps have plated-steel screws that rust away.
- Scrape barnacles off stainless underwater parts such as prop shafts. BoatUS warns that pits can form under them.
Official references
We read these to write this guide. Your engine's own manual always wins.
- Practical Sailor – Simple Tips for Maintaining Stainless Steel
- Practical Sailor – Passivating Stainless
- BoatTest – Preventing Rust Stains On and Around Stainless-Steel Hardware
- Cruising World – Crevice Corrosion, the Hidden Threat in Your Rigging
- ASSDA – Cleaning of Exterior Stainless Steel
- ASSDA – Common Misconceptions About Stainless Steel
- BoatUS – Not-So-Stainless Steel
- BoatUS – Boat Rust And Corrosion (types of corrosion, with surveyor photos)
Safety: BoatMend is for information only and does not replace a certified marine technician. You are responsible for your safety and your boat. Read the full disclaimer.
Last updated 2026-10-25
Related guides
How to Find and Fix Leaking Deck Hardware (Rebedding Cleats, Stanchions and Tracks)
Track down the cleat, stanchion base or track that is dripping into the cabin, then remove it, seal the deck core and bed it again with the right sealant so the leak stops for years instead of weeks. Catching it early protects the deck core from rot.
How to Inspect Wakeboard Tower, T-Top and Bimini Hardware
Towers, T-tops and biminis carry tow ropes, speakers, boards, electronics and wind loads, all on a handful of bolts. Learn how to check the welds, bases, backing plates, bolts, folding hinges and accessory loads before a crack or a loose bolt becomes an accident.

How to Inspect Your Sailboat's Standing Rigging
A step-by-step owner's inspection of the wires, fittings, turnbuckles, pins, chainplates and mast that hold your rig up, plus how to decide when it is time for a rigger and new rigging. Includes what insurers commonly expect for older rigs.

Saltwater Outboard Care: The After-Every-Trip and Monthly Routine
A simple routine that keeps salt from eating your outboard, built from Honda, Yamaha, Mercury and Suzuki advice. It covers flushing after every trip, washing, where to spray anticorrosion (and where never to), monthly greasing, anodes, and tilting up or storing out of the water.

How to Clean, Remove Oxidation and Wax Your Boat's Gelcoat (Plus Pontoon Tubes)
Wash your hull the right way, bring back chalky, faded gelcoat with compound, and seal it with wax so it stays glossy and protected from the sun. Includes how to clean and protect the aluminum tubes on a pontoon boat.
How to Repair Small Gelcoat Chips and Scratches
Fill and blend small chips, dings and scratches in your boat's gelcoat with a repair kit so they stop letting water into the fiberglass and look close to new. Also learn to spot damage that is structural and needs a pro.