Losing Coolant With No Visible Leak? How to Pressure Test a Closed Cooling System and Its Cap
When the coolant level keeps dropping and you can't find a drip, a simple hand-pump pressure tester can show where it's going. Learn how to test the system and the pressure cap safely on a cold engine, isolate the heat exchanger and coolant-heated appliances, and recognize the signs of a head gasket or internal leak that need a mechanic.
Time
2 h
Shop would charge
$150-600
Applies to
Marine diesel, Gas inboard, Sterndrive (I/O)
Safety first: Never open the pressure cap or connect a tester on a hot or warm engine. A pressurized cooling system can spray scalding coolant the moment the seal lifts. Let the engine cool completely (the cap and hoses should feel cool to your bare hand), then turn the cap slowly to its first stop with a rag over it. Never pump a tester above the pressure stamped on your cap or given in your engine manual, because too much pressure can damage hoses, seals and the heat exchanger. If you find coolant in a cylinder or a lot of coolant in the oil, do not start the engine; call a mechanic. If the engine overheats or you see smoke, steam or water rising in the bilge while under way, slow down, get to safety and call TowBoatUS, Sea Tow, or the Coast Guard on VHF 16 or 911 if anyone is in danger.
Owners often ask
- My diesel keeps losing coolant but I can't find a leak anywhere. Where is it going?
- Can I use an auto parts store cooling system pressure tester on my boat engine?
- Can a dented filler neck make my new coolant pressure cap leak?
This guide walks you through it. Still stuck? Ask the AI Mechanic about your engine.
Tools
- Cooling system pressure tester (hand pump with gauge) with an adapter that fits your heat exchanger or expansion tank filler neck
- Cap adapter for testing the pressure cap on the same pump
- Flashlight or headlamp and an inspection mirror
- Clean white paper towels or rags (coolant shows up well on white)
- Drain pan, funnel and a container for any coolant you remove
- Nut driver or screwdriver for hose clamps, plus hose plugs or caps for isolating hoses
- Nitrile gloves and safety glasses
- Notebook or the BoatMend log
Parts & supplies
- Premixed coolant of the type your engine manual specifies, to top up
- Replacement pressure cap with the rating your engine maker specifies (only if yours fails)
- Spare hose clamps
Before you start
How a closed system works: on a freshwater-cooled (closed-cooling) engine, a mix of coolant and water circulates inside the engine and through a heat exchanger, where seawater carries the heat away. A pressure cap on the heat exchanger or expansion tank holds the system under light pressure when hot, which raises the boiling point. When the coolant expands, the cap lets some into the recovery bottle, and as it cools, the coolant is drawn back. PassageMaker notes that cap ratings commonly fall somewhere between 6 and 15 psi; your cap has its rating stamped on top, and your manual gives the correct one.
Where lost coolant goes: if the level keeps dropping, it went somewhere. The usual destinations are:
- out through a small external leak (a hose, clamp, pump weep hole or drain plug) that dries before you see it
- out past a weak cap or through the recovery bottle and its hose
- into the seawater side of the heat exchanger through a pinhole in a tube, then overboard with the exhaust
- into the engine itself through a head gasket or a crack, where it shows up in the oil or goes out as steam
- into another cooler on the coolant circuit, such as a transmission cooler or a water heater loop
Is it really a leak? Good Old Boat points out that a system that was recently drained and refilled can keep "taking" coolant for a while as trapped air works its way out. Make sure the system has been bled correctly (see the closed cooling guide) before you go hunting.
What you need: a cooling system pressure tester is a hand pump with a gauge and a set of adapters; Good Old Boat put the cost of a kit at roughly $50 to $150, and some auto parts stores lend them. The hard part on a boat is the adapter: marine filler necks and caps often differ from automotive ones, so check that the kit (or a separate adapter) fits your heat exchanger or tank neck and your cap before the day you need it. PassageMaker quotes a mechanic who calls a tester handy and inexpensive and stresses having the right adapters for your engines.
Read the cooling-system pages of your engine manual first. They give the cap rating, the test pressure, and any procedure that differs from this general guide.
Steps
Before you test anything, find out how fast you are losing coolant. With the engine fully cold, check the level at the heat exchanger or tank filler neck, not only in the recovery bottle. PassageMaker warns that a poor cap seal or a pinhole in the bottle hose can break the siphon, so the bottle may look fine while the heat exchanger is low. Northern Lights gives its generator owners the same rule for the daily check: coolant level at the pressure cap, not just the overflow bottle, plus a look underneath for leaks. It also suggests servicing the heat exchanger and replacing the coolant every two years on its generators (typical; confirm in your manual). Mark the bottle level with tape and note the engine hours. Check again after each outing. A cup a week and a cup a season point to very different problems.
With the engine off and cool, go over the whole system with a flashlight and white paper towels:
- every coolant hose and clamp, especially the underside where drips collect
- the freshwater (circulating) pump weep hole; drips there mean worn seals
- the heat exchanger end caps, drain plugs and petcocks
- the recovery bottle, its hose and its connection at the filler neck
- hoses running to a water heater, cabin heater or transmission cooler
- the bilge directly under the engine
Dried coolant often leaves a crusty white, green or pink trace. A good look after running, once the engine has cooled, often finds a seep that only leaks when hot.
Pull the dipstick and look under the oil filler cap. A milky, light-brown "milkshake" means water or coolant is getting into the oil; stop here and read the water-in-oil guide, because running that engine can ruin the bearings. Good Old Boat also suggests checking the transmission fluid; if your transmission has a cooler on the coolant circuit, a rising level or milky fluid can point to a leak inside that cooler.
Run the engine up to normal temperature and watch the exhaust. A bit of vapor on a cold morning is normal, but persistent white smoke or steam with a sweet smell once the engine is warm can mean coolant is burning in a cylinder. Bubbles rising steadily in the recovery bottle, or coolant pushed out of the bottle when the engine is warm, can mean combustion gas is getting into the coolant. These are warning signs, not proof; keep them in your notes for the pressure test and the mechanic.
Shut down and wait until the engine is cold, which can take hours after a long run. Put a rag over the cap, turn it slowly to the first stop and pause to let any remaining pressure hiss out, then remove it. Check the seal: a cracked, hard or flattened rubber gasket, a weak spring or corrosion on the filler neck's sealing surface can all let coolant escape. Look closely at the filler neck's lip and the cap's locking tabs too; owners report that a bent or dented neck flange stops even a new cap from sealing.
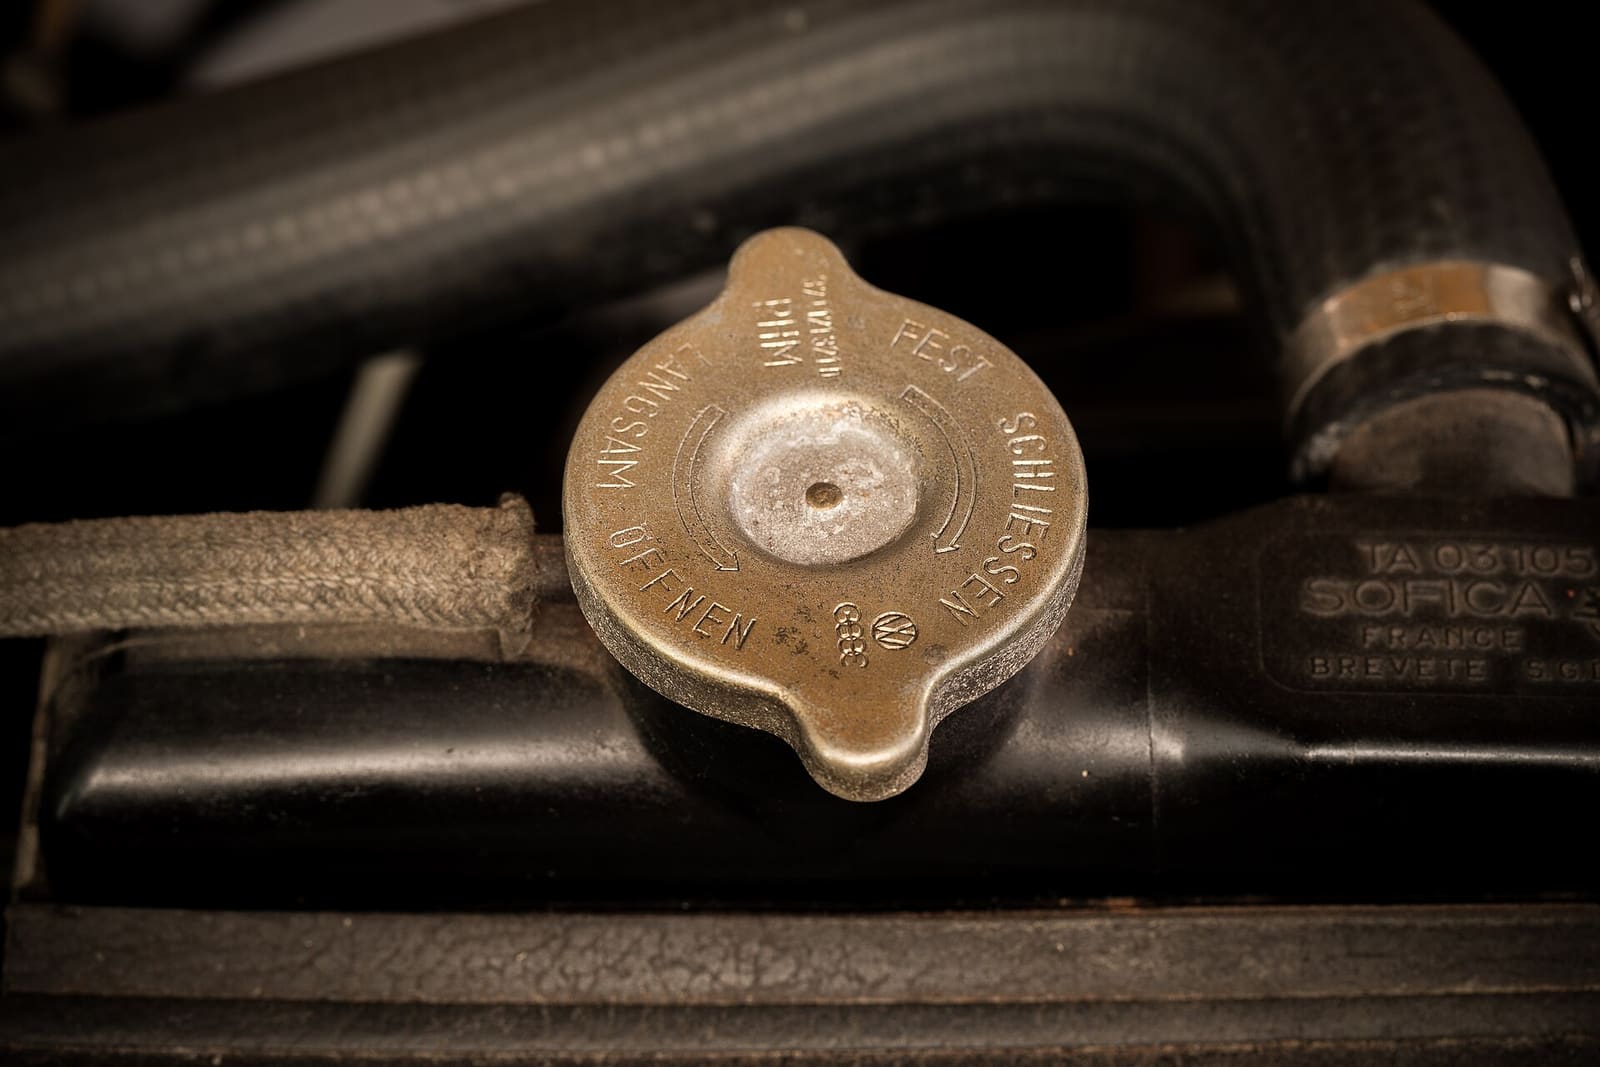
A pressure cap (this one is from an old car, and its German text says 'open slowly' and 'close tight'). Marine caps have their pressure rating stamped on top; turn them slowly to the first stop, and only when cold. Photo: Christoph Braun / Wikimedia Commons · CC0 1.0 Fill the system to the correct level with the coolant your manual specifies. Fit the tester's adapter to the filler neck so it seals the same way the cap does. Good Old Boat suggests wetting the adapter's rubber seal with a little water-based lubricant; if you later see bubbles at the seal when you brush on soapy water, the leak is the tester, not the engine.
Pump slowly until the gauge reads the pressure on your cap or the test pressure in your manual. Never go above it. Note the reading and the time.
A healthy system should hold steady. Good Old Boat recommends leaving it under pressure for several hours or overnight and checking for seepage with the engine cold. While it holds:
- go back over every hose, clamp, pump, drain and end cap from step 2 with a flashlight and paper towels
- listen for hissing
- look in the bilge and under the heat exchanger
A slow drop with a visible drip means you found it. Tighten or replace the clamp, hose or plug and test again. A drop with nothing visible outside means the coolant is going somewhere internal; move on to the next steps.
A pinhole in a heat exchanger tube lets coolant pass into the seawater side and go out with the exhaust, so you never see it. Good Old Boat's method:
- close the raw-water seacock
- drain the seawater side and disconnect the raw-water hoses from the heat exchanger's seawater inlet and outlet
- pressurize the freshwater side with the tester
- watch the open seawater ports; coolant dripping out means the tubes are leaking inside
If the ports don't drain well, the exchanger may need to come off so a radiator or heat-exchanger shop can pressure test it. Forum owners report exchangers that passed a short test and leaked later, so a shop test of the removed core is the most reliable answer. Have the shop clean it at the same time (see the heat exchanger cleaning guide).
If your engine heats a water heater or a cabin heater, its coolant runs out through hoses to that appliance and back. A leak inside the water heater's coil or anywhere along those hoses counts as a cooling-system leak. Good Old Boat suggests disconnecting those hoses at the engine and capping the engine-side fittings, then testing again. If the engine now holds pressure, the leak is in the loop or the appliance. Follow your engine and water heater manuals when you reconnect, and bleed the air out afterwards.
Fit the cap to the tester with the cap adapter and pump slowly. A good cap holds its rated pressure and releases only above it. A cap that leaks down or opens well below its rating lets coolant boil off and escape, which can look exactly like a leak, and PassageMaker quotes a mechanic who says a failed cap often leaves an engine overheating. Replace a failing cap only with one carrying the rating your engine maker specifies; Good Old Boat warns that too low a rating lets coolant boil off and too high a rating can damage parts not designed for it. Test a new cap too, because new caps can be faulty. Many radiator shops will test one for you.
These signs together point to a leak inside the engine, which is mechanic territory:
- pressure on the tester gauge rising with the pump connected but not being pumped while the engine runs (combustion gas pushing into the coolant); Good Old Boat describes this check and warns to shut down if it climbs, because it can damage the tester
- coolant found in a cylinder when a mechanic removes injectors or glow plugs
- milky oil, or oil in the coolant
- steady white, sweet-smelling smoke from a warm engine
- the system holds pressure cold but loses coolant only when hot and running
Don't keep running an engine with these signs. A mechanic can confirm with a combustion-gas (block) test on the coolant, a compression or leak-down test, and inspection of the head, exhaust manifold and any coolant-cooled turbo or aftercooler.
Remove the tester slowly so pressure bleeds off, top up to the correct cold level, refit the cap firmly and make sure the recovery bottle hose is tight. Run the engine, watch the temperature gauge and recheck the level once cold. Record the test pressure, how long it held, what you found and what you replaced in BoatMend. The next time the level drops, you'll know what was already ruled out.
Common mistakes
- Opening the cap on a warm engine "just to look." It only takes one spray of hot coolant.
- Trusting the recovery bottle level and never checking the heat exchanger itself.
- Pumping the tester well above the cap rating "to find the leak faster."
- Buying an automotive kit without checking that an adapter fits the marine filler neck and cap.
- Assuming a short test that held means there's no leak. Slow internal leaks may only show up over hours or only when the engine is hot.
- Forgetting the water heater and cabin heater loop when hunting for a leak.
- Replacing a cap with any cap that fits instead of one with the specified rating.
- Topping up for a whole season without finding out where the coolant goes.
When to call a pro
- Milky oil, coolant in the oil or transmission fluid, or coolant found in a cylinder
- Pressure rising on the gauge with the engine running, or steady bubbles in the recovery bottle
- The system loses pressure and you can't find any external leak
- The heat exchanger, aftercooler or water heater coil needs to come off for a shop pressure test
- Overheating that keeps returning after you've fixed the cap and topped up
- Any leak on a coolant-cooled exhaust manifold or turbo
- You don't have the correct adapter or the test pressure for your engine
Tips
- Buy or borrow the tester and adapters before the season and do a quick test when everything is healthy, so you know what "normal" looks like on your engine.
- Carry a spare pressure cap with the correct rating; PassageMaker's mechanics recommend it.
- Write the cap rating and the test pressure from your manual inside the engine room on a tag.
- After you replace a hose or clamp, recheck it once the engine has run and cooled again.
- If the boat has twin engines, compare how much each one uses. The one that drinks more is the one to test.
Official references
We read these to write this guide. Your engine's own manual always wins.
Safety: BoatMend is for information only and does not replace a certified marine technician. You are responsible for your safety and your boat. Read the full disclaimer.
Last updated 2026-11-06
Related guides
How to Check and Change Coolant in a Closed Cooling System
Check, test and change the coolant in a freshwater-cooled (closed cooling) inboard, sterndrive or diesel, and learn the heat exchanger basics that keep it working. Old coolant quietly eats hoses, pumps and engine passages, and many boats go a decade without a change.
Testing Engine Coolant: Test Strips, Refractometer or Lab Analysis
Coolant can look perfect and still be worn out. Learn how to test the coolant in a closed-cooled inboard, sterndrive, diesel or generator with test strips, a refractometer or a mail-in lab kit, what each result tells you, and when the answer is a coolant change or a call to a mechanic.
Diesel Heat Exchanger Service: Zincs, End Caps, Tube Cleaning and Pressure Testing
Your diesel's heat exchanger moves engine heat into the seawater, and it slowly fills with scale, broken zinc pencils and impeller pieces. Learn how to check the zincs, open the end caps, clean the tubes safely, and when to have the core removed, descaled and pressure-tested by a shop.
Engine Overheating - Troubleshooting Guide
Work through the most likely causes of a hot engine or overheat alarm, from a blocked water intake to a worn impeller or stuck thermostat. Acting fast and in the right order can save your engine and often gets you home without a tow.
Milky Engine Oil or Water in the Oil - What It Means and What to Do
Milky, creamy or rising engine oil usually means water is getting into the engine. Learn why you should stop running it right away, how to tell harmless condensation from a real leak, and which parts are the usual suspects: head gaskets, exhaust risers and manifolds, intake manifold gaskets, oil coolers and freeze cracks.

Diesel Exhaust Smoke: What Black, White and Blue Smoke Mean
Learn to read the color of your marine diesel's exhaust and run the simple checks that go with each color, from a dirty air filter or fouled prop to a worn mixing elbow or head gasket. Catching smoke early can save an engine.
Marine Water Heater Care: No Hot Water, Relief Valve, Anode and Winter Draining
Most boat water heaters warm up two ways: a 120-volt electric element at the dock and a coil that borrows hot coolant from the engine underway. Learn the safe owner checks when the hot water quits, what a dripping relief valve means, and how to drain and bypass the tank for winter.
How to Do a Compression Test on an Outboard, Sterndrive, Inboard or PWC
A compression test tells you whether the pistons, rings, valves and head gasket in each cylinder are sealing. Learn when to do one, how to do it safely, how to read the numbers by comparing cylinders, and what a wet test and a leak-down test add.
Hose Clamps on Boats: Choosing, Installing and Inspecting Them
A rusted or wrong hose clamp can sink a boat at the dock, leak fuel or let exhaust into the cabin. Learn which clamps belong on a boat (all-316 stainless, embossed band, T-bolt where needed), when to double them, how tight is tight enough, and how to find the ones that are about to fail.