How to Replace an Outboard Fuel Line and Primer Bulb
A cracked hose or a stiff primer bulb can leak gasoline, starve your engine or shed rubber into the fuel. Learn how to choose Coast Guard-rated fuel hose, the right connectors for your engine brand and good stainless clamps, install the bulb pointing the right way, leak-test the job and get rid of the old parts safely.
Time
45 min
Shop would charge
$100-250
Applies to
Outboard
Safety first: You'll be handling gasoline. Work outdoors or in a well-ventilated space with no smoking, sparks, running tools or pilot lights nearby, and keep a fire extinguisher within reach. If you find fuel leaking inside the boat or smell gas in the bilge, don't start the engine or flip switches: get everyone off and call a marine mechanic, or 911 if the leak is large. This guide covers the line between a portable tank and the engine. Hoses inside the boat on built-in tanks (fill, vent and supply lines, anti-siphon valves) are best left to a pro unless you can reach and replace them exactly to spec.
Owners often ask
- My primer bulb won't get hard. Do I replace the bulb or the whole fuel line?
- Which way does the arrow on the primer bulb go, and what fuel hose rating do I need?
This guide walks you through it. Still stuck? Ask the AI Mechanic about your engine.
Tools
- Flat screwdriver or 5/16-inch nut driver for hose clamps
- Sharp utility knife or hose cutter
- Side cutters (for removing crimp-type clamps)
- Clean rags and oil-only absorbent pads
- Approved gasoline container for draining fuel
- Paper towels (for the leak test)
- Nitrile gloves and safety glasses
- Fire extinguisher within reach
Parts & supplies
- Fuel line kit for your engine brand and tank (hose, primer bulb and both connectors), or separate parts below
- Marine fuel hose marked USCG Type A1 (low-permeation A1-15 if available), same inside diameter as the old one
- Primer bulb rated for ethanol-blended fuel and sized for your hose
- Engine-end and tank-end quick connectors that match your outboard and tank
- All-316 stainless marine hose clamps sized for the hose
Before you start
When to replace. Replace the line and bulb if you see any of these:
- Hose that is hard, cracked, swollen, sticky or soft and spongy
- A gas smell when you wipe the hose with a dry rag (the hose is breaking down)
- A primer bulb that won't firm up, is stiff and hard to squeeze, or is cracked or swollen
- Fuel weeping at a connector, or connectors that no longer click and lock
- You don't know how old the line is
BoatUS notes that fuel hose has a useful life of about 10 years and that older hoses may not be compatible with ethanol fuel. Yamaha says that if the bulb won't get firm and there is no leak, the bulb should be replaced. BoatUS adds that a stiff bulb usually means the small one-way valves inside are failing, and the old rubber can shed bits that block fuel flow. Don't try to soften an old bulb.
Know the hose ratings. The Coast Guard rules in 33 CFR 183.540 define four types of marine fuel hose, all based on the SAE J1527 standard:
- Type A hose also passes a fire test (it has to hold fuel in a fire for a set time). Type B does not.
- Type 1 hose has low fuel permeation (fuel vapor seeping through the wall). Type 2 has higher permeation.
- Each hose must be printed on the outside, at least every 12 inches, with "USCG TYPE A1" (or A2, B1, B2), the year it was made and the maker's name.
For a fuel supply line, BoatUS's advice is simple: buy A1 (or the newer low-permeation A1-15 when available). It is the most fire resistant and least permeable. Never use automotive fuel line, vacuum hose, clear vinyl tubing or garden hose.
The EPA rules too. On top of the Coast Guard hose types, EPA emission rules (40 CFR 1045.112) limit how much fuel vapor can seep through the fuel lines of outboards and portable marine tanks: for lines made from 2009 on, and for primer bulbs from 2011. EPA lets makers certify a portable-tank line as one assembly of hose, primer bulb and self-sealing connectors. That's one more reason a complete, labeled kit from a marine supplier is the easy choice over a line pieced together from random parts.
Know your connectors. Quick connectors are not universal. Mercury/Mariner (and some Force engines) use a clip-on style; Johnson, Evinrude and other OMC engines use their own clip-on style; Yamaha uses its own connector; Suzuki, Honda, Tohatsu and others may use their own or one shared with another brand. A Mercury product listing, for example, describes separate connectors for Mercury-style and OMC-style clip-on fittings, both for 5/16-inch inside-diameter hose. The simplest path is a complete fuel line kit labeled for your engine brand and your tank. Bring the old line to the store if you're unsure.
Match the hose size. Use the same inside diameter as the original. Many small and mid-size outboards use 5/16-inch hose and larger ones often use 3/8-inch (typical; confirm in your manual or on the old hose). The primer bulb and connector barbs must match that size.
Steps
Turn the engine off and remove the key or kill-switch lanyard. Open the portable tank's cap slowly, away from the engine, to release pressure (modern sealed tanks build pressure in the sun), then close it. Unplug the fuel line from the engine and from the tank.
Hold the line over an approved gasoline container and squeeze the bulb to push fuel out of the tank end. Wipe up drips right away with an oil-only absorbent pad. Never let fuel run onto the ground or into the water.
Take a photo of how the line is routed and which end of the bulb faces the engine. Note the overall length and where the bulb sits. Make the new line the same length or only slightly longer: a hose that's too long gets kinked or stepped on, and one that's too short gets strained when the engine turns or tilts.
Look at the connector on the tank and its O-ring. A cracked fitting or a flattened, cracked O-ring will leak or suck air even with a new hose. Replace it if in doubt. If the tank also looks swollen, cracked or old, see our fuel tank inspection guide.
Cut the hose square with a sharp knife or hose cutter. A ragged or angled cut can leak or let rubber shavings into the fuel. Shake out any bits. If your kit comes pre-assembled, skip to step 8.
Every primer bulb has an arrow molded on it showing the direction of fuel flow. It must point toward the engine. BoatUS explains why: the bulb has a one-way valve at each end, and installed backward it won't move fuel at all. Push the hose fully onto each bulb barb.
Push each hose end fully onto the barb of its connector (engine end and tank end). Put a clamp on every joint: each connector and both ends of the bulb. Use clamps made entirely of 316 stainless steel; BoatUS warns that some clamps have cheap steel screws that rust and break, and a magnet can help catch them. Some kits use crimp or snap clamps designed for that fitting; use them as the kit instructs.
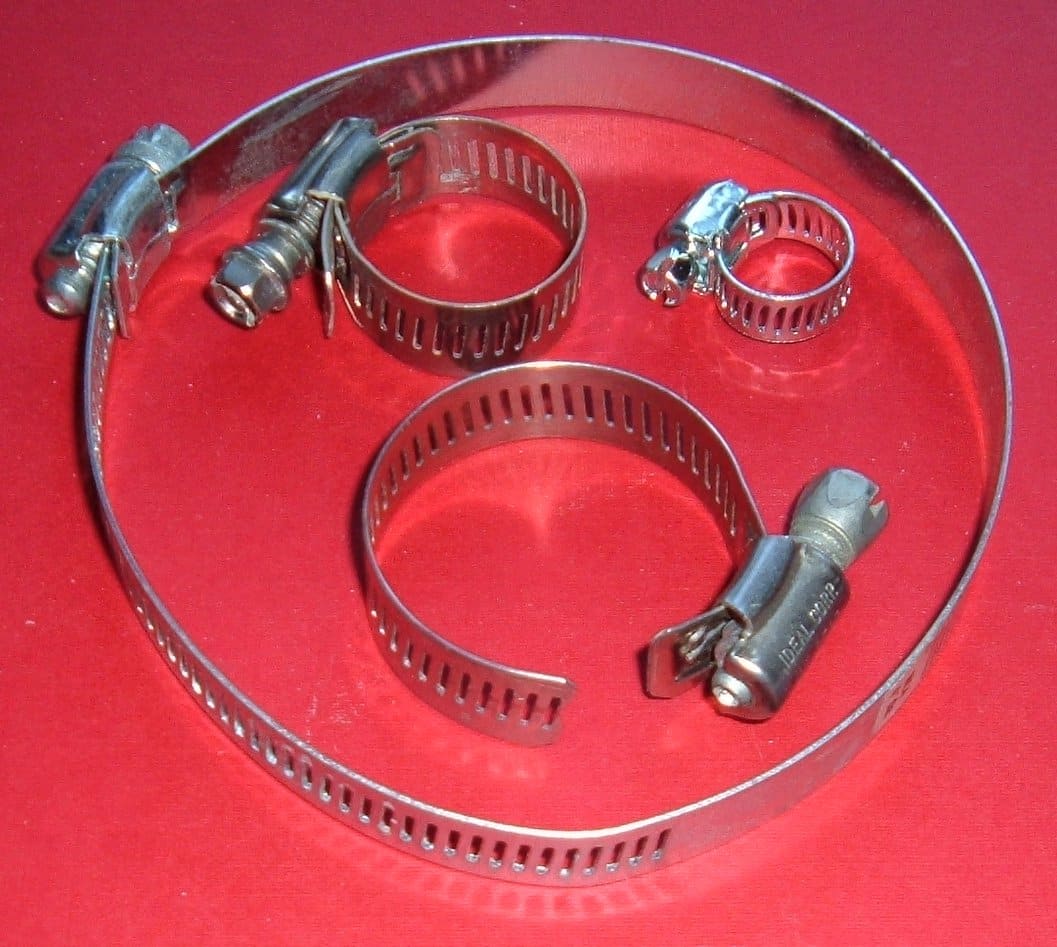
Screw-band clamps come in many sizes; pick all-316 stainless marine clamps that fit your hose. Photo: ArnoldReinhold / Wikimedia Commons · CC BY-SA 3.0 Tighten screw clamps firmly by hand with a screwdriver or nut driver. BoatUS's testing found that an average person with a nut driver applies about the right force for small clamps. A ratchet or power driver can cut the hose or strip the clamp.
Run the new line where it won't be kinked, pinched by a hatch or seat, stepped on or rubbed by sharp edges, and where it can't sag into bilge water. Leave enough slack for the engine to turn lock to lock and tilt fully up. Keep the bulb somewhere you can reach it easily.
Where the line has to cross an edge (a splashwell lip, a transom cutout, a seat frame), protect it with a piece of split hose or a chafe sleeve. The Coast Guard has warned (Safety Alert 09-24) that fuel hoses worn through by chafing can spray fuel onto a hot engine and start a fire, and that inspections should look for cracks, abrasion and wear, not just leaks.
Connect the line to the tank and the engine. Squeeze the bulb until it becomes firm. Then:
- Wrap a dry paper towel around each joint and look for wet spots or stains.
- Look at the bulb, both ends and the connectors for drips.
- Sniff along the line.
A bulb that won't firm up, or goes soft again quickly, means an air or fuel leak at a fitting, a bad O-ring, or a faulty bulb. Fix it before you start the engine.
Start the engine in the water, in a test tank, or on external flush muffs with the water running first (never on the built-in flush port with the engine running unless your manual allows it). Let it run a few minutes, then shut it off and re-check every joint with a dry paper towel. Watch the bulb while it runs: if it collapses flat, something is restricting fuel flow (tank vent, kink, clogged filter). See our ethanol fuel care guide for how to track that down.
Take a short run at varied speeds, then shut down and check the joints one more time. If the engine stumbles or dies at speed with the new line, look at the tank vent, the fuel filter and the connectors before blaming the hose.
Pour the drained fuel into your approved container and take it to a household hazardous waste collection site (contact your local waste agency for the nearest one). Let the old hose and bulb air out outdoors, away from ignition sources, until they're dry. Then follow your local rules for disposing of them; some areas treat fuel-soaked parts as household hazardous waste. Put used absorbent pads in a sealed bag and handle them the same way.
Common mistakes
- Installing the primer bulb backward, with the arrow pointing toward the tank.
- Using automotive, vacuum or clear vinyl hose instead of USCG-rated marine fuel hose.
- Buying a "universal" kit whose connectors don't fit the engine or tank. Owners of older engines often report aftermarket end fittings that look right but let air in (the bulb never firms up and you hear a gasp of air at the engine end with each squeeze); a genuine connector for your engine brand usually fixes it.
- Forgetting the small O-rings inside the tank and engine fittings. On an engine that sat for years they're often hard or cracked, and a new line can't seal against them.
- Skipping clamps on the bulb ends, or using cheap clamps with steel screws.
- Overtightening clamps with a power driver until they cut the hose.
- Leaving the line too long so it kinks under a seat or hatch.
- Pumping an old stiff bulb harder instead of replacing it.
- Starting the engine before checking every joint for leaks.
When to call a pro
- Any fuel leak or gasoline smell inside the boat (stop and call; don't start the engine)
- The fuel hoses run under the deck or to a built-in tank you can't reach without removing panels
- You suspect the anti-siphon valve, fuel pickup or tank fitting inside a built-in tank
- The engine still starves for fuel after a new line, a clean filter and a clear tank vent
- A connector on the engine itself is cracked or leaking (the fitting on the cowl or bracket)
Tips
- Carry a spare primer bulb, two clamps and a short piece of A1 hose in your toolbox.
- Write the replacement date on the hose with a paint pen and log it in BoatMend; plan to replace it again in about 10 years, sooner if it shows wear.
- A fuel-demand valve between the tank and the bulb can stop pressure in a hot portable tank from pushing fuel through the engine. Ask your dealer if it suits your setup.
- Squeeze the bulb before every trip: it's the fastest fuel system check you can do.
Official references
We read these to write this guide. Your engine's own manual always wins.
- eCFR – 33 CFR 183 Subpart J, Fuel Systems (183.540 hose standards, 183.558 hoses and connections)
- eCFR – 40 CFR 1045.112, Evaporative emission standards (fuel lines, primer bulbs, portable marine tanks)
- eCFR – 40 CFR 1060.102, Permeation emission specifications for EPA fuel lines (portable tank line assemblies)
- US Coast Guard – Marine Safety Alert 09-24, Chafing on Fuel Hoses Can Cause Catastrophic Fires
- BoatUS – Choosing the Correct Boat Hose
- BoatUS – Marine Exhaust and Fuel Hoses
- BoatUS – Outboard Primer Bulbs
- BoatUS Seaworthy – Hose Clamps
- Yamaha Outboards – Maintenance Matters, Fuel and Fuel System
- Mercury Marine – Quick Disconnect Fuel Line Connector for Outboard End (product page)
- Mercury Marine – Fuel Line Connector for Select Evinrude, Johnson and OMC Engines (product page)
- Mercury Marine – Service and Support FAQs (ethanol and older fuel system parts)
Safety: BoatMend is for information only and does not replace a certified marine technician. You are responsible for your safety and your boat. Read the full disclaimer.
Last updated 2026-10-24
Related guides
Ethanol (E10) Fuel Care: Stabilizer, Phase Separation, Fuel Lines and Tank Vents
Keep E10 gasoline from damaging your boat engine. Learn how to use stabilizer, test for water and phase separation, and inspect the fuel lines, primer bulb, anti-siphon valve and tank vent. Most fuel-related breakdowns start with one of these.
How to Replace a Fuel/Water Separating Filter (and Check for Water in Your Fuel)
Swap the spin-on fuel/water separator on your gas boat and learn to spot water and ethanol phase separation before it stalls the engine. It is one of the cheapest jobs on the boat and one of the best protections for a fuel-injected engine.
How to Inspect Your Boat's Fuel Tank, Fill, Vent and Hoses
A leaking gas tank is one of the most dangerous problems a boat can have, and it usually starts out of sight. Learn how to inspect portable and built-in tanks, spot aluminum tanks corroding from below, know the ethanol risk for old fiberglass tanks, and check the fill, vent, hoses, clamps and sender, plus why tank replacement is a job for a pro.
Engine Starts Then Dies - Troubleshooting Guide
Track down why your boat engine fires up and then stalls, whether at idle, when you shift into gear, or after a few minutes of running. Most causes are in the fuel supply and can be checked with no special tools.
Loss of Power, Hesitation or Misfire - Troubleshooting Guide
Figure out why your engine bogs down, stumbles, will not reach full rpm or runs rough. Work from simple checks like trim, prop and fuel filter to ignition and engine protection modes before paying for diagnostics.
How to Refuel a Boat Safely (Gas Dock, Gas Station and Portable Tanks)
A step-by-step fueling routine that keeps gasoline vapor out of your bilge and fuel out of the water: shut everything down, close up, keep the nozzle in contact, stop short of full, ventilate, run the blower and sniff before you start. Includes portable tanks, personal watercraft and what to do about a spill.
Portable Gas Cans and Fuel Storage: Filling, Storing at Home and Aboard, and Getting Rid of Old Gas
Gas cans and portable boat tanks are handy and dangerous in equal measure. Learn what makes a modern can compliant, why you always fill it on the ground, how to store gasoline at home and on the boat, how long ethanol fuel really lasts, and how to dispose of old gas legally.
Engine Won't Start or Won't Crank - Troubleshooting Guide
Find out why your boat engine will not turn over or will not fire, starting with the simple things owners miss most, like the kill switch lanyard and battery switch. Many no-starts are fixed at the ramp in minutes without a tow.
Fuel Pump Checks - Is It the Pump or Something Starving It?
Bogging at speed, surging or dying after a few minutes is often blamed on the fuel pump, but vents, filters, primer bulbs and anti-siphon valves cause the same symptoms. Learn how mechanical, pulse and electric pumps work, the safe checks you can do, what the primer bulb is telling you, and why a real pressure test needs the right gauge and the factory spec.