Outrigger Care: Poles, Halyards, Release Clips and Bases
Keep your outriggers strong and working by rinsing them after every trip, checking poles, halyards, pulleys, release clips and through-bolted bases for wear and corrosion, storing them down and secured, and handling them safely under way and near power lines.
Time
1 h 30 min
Shop would charge
$150-600
Applies to
All engines · Center console, Fishing boat, Cabin cruiser
Safety first: Outrigger poles are long, mostly aluminum and can conduct electricity. Look up for power lines before you raise them at a ramp, in a boatyard or near a bridge; BoatUS has claims from boats that hit power lines at launch ramps. A falling pole can injure people and damage the boat, so get help and use a safety line when you lower or remove tall poles. Wear safety glasses when working with halyards and release clips under tension.
Owners often ask
- How often should I replace my outrigger halyards and release clips?
- Can I run with my outriggers up, or should they be stowed when traveling?
This guide walks you through it. Still stuck? Ask the AI Mechanic about your engine.
Tools
- Hose with fresh water and a soft wash brush or mop (wooden handle)
- Chamois or microfiber towels
- Wrenches and sockets for the base bolts
- Crimping tool (for re-rigging halyards)
- Binoculars or a phone camera with zoom (to inspect pole tips)
- Safety glasses and gloves
- Helper and a length of line (if lowering or removing tall poles)
Parts & supplies
- Replacement halyard line (monofilament or braided cord, as your rigging uses)
- Crimps, loop protectors and beads sized to the line
- Replacement release clips, pulleys or shock cords (if worn)
- Spare bushings and base hardware from your outrigger maker
- Lubricant and protectant approved by your outrigger maker
- Marine sealant for base bolts (if rebedding)
Before you start
Discover Boating describes outriggers as a system with three parts: the mounting hardware (bases that go through the T-top, hardtop or cabin roof on smaller boats, or side mounts on bigger ones), the poles (up to about 18 feet on small boats, and up to about 40 feet on large sportfishers), and the rigging (one to three release lines per pole, each with a line, a release clip and a halyard pulley held tight by a shock cord at the gunwale).
Know what you have: telescoping poles, fixed poles with spreaders and cables, manual or hydraulic layout arms, and which bases and locks hold them. Find your maker's care instructions and approved lubricants; the wrong product can damage the anodized finish.
Steps
Rupp Marine's first rule is a freshwater rinse after every trip. Salt left on the poles, pulleys and locks causes stiff movement, seized locks and corrosion. Marlin magazine recommends drying the poles afterward with a chamois on a wooden-handled mop, since an aluminum handle can scratch the poles and the boat. On hydraulic outriggers, Marlin says to extend the layout arms fully and rinse the inner hydraulic cylinder to keep it smooth and protect the seals.
Rupp warns that harsh metal polishes, abrasives and acidic cleaners can permanently damage the anodized finish, after which the pole corrodes and pits much faster. Avoid anything labeled "acid-based," "aluminum brightener" or "metal polish" unless it says it is safe for anodized aluminum. Use a non-abrasive marine cleaner, and Rupp suggests an occasional coat of marine wax or ceramic coating. Do the hardware, cables and turnbuckles too, not just the tubes.
Look along each pole in good light, using binoculars or a zoomed photo for the tips. Marlin's checklist: bends, cracked or broken spreaders and tips, frayed or loose cables, damaged or seized pulleys, and missing sleeves or hardware. Watch for white powder, bubbling paint or pits, especially where stainless fittings touch aluminum (that is where galvanic corrosion starts). A bent or cracked section should be replaced, not straightened.
Halyard lines wear from sun and salt and from running through pulleys. Discover Boating says they should be checked regularly and replaced every couple of seasons. Look for fuzzy, flattened or discolored spots, stiff monofilament, and chafe where the line touches the pole guides or the release clip. Marlin points out it is much easier to replace a halyard at the dock than in the middle of a fishing day.
Discover Boating describes a simple way to replace a line without lowering the pole:
- Put the outrigger in fishing position and pull the release clip down to the halyard pulley.
- Cut the old line at the top of the clip and join the new line to it with a crimp, tape or small knot that fits through the top pulley.
- Pull the old line up and back down through the guides until the new line is in place.
- Add a bead as a stop, crimp the new line to the clip with loop protectors where it bends, run it through the halyard pulley and back to the clip, pull it tight against the shock cord and crimp it.
Use line and crimps that match each other. Discover Boating's example used 300-pound monofilament with matching crimps; follow your maker's or tackle shop's recommendation.
Spin each pulley by hand; it should turn smoothly without wobble or grinding. Replace cracked or sun-faded shock cords that no longer hold tension. Rupp notes that release clips set wrong can fail to release when a fish strikes, which can damage the outrigger. Make sure each clip opens at the tension you want and closes fully. Clips that creep back toward the boat while trolling are a common complaint; locking halyard pulleys are one fix Discover Boating mentions.
Rupp warns that over-tensioned halyards add friction and can overload the tip sections until they bend, while slack ones give poor bait presentation. Tension the line just enough that baits track cleanly. If you are not sure, ask an experienced captain to show you.
Raise, lower and rotate each outrigger through its full range. It should move smoothly and lock positively in every position. Rupp recommends replacing missing bushings, tightening loose bolts and lubricating moving parts with the products the maker approves. Rupp also says manual layout (knuckle) arms should be set to suit the pole length and line up with the tube when stowed; a misaligned arm binds and loosens over time.
Outrigger bases carry big loads, especially with long poles in a seaway. Look at the bolts and the deck, T-top or hardtop around each base:
- Bolts should be tight, with backing plates or large washers under the top.
- Look for cracks in the gelcoat around the base, flexing when you push on the pole, or rust stains.
- Check for water leaks into the cabin or hardtop under the base.
Loose bolts or cracking mean the base needs to be rebedded or reinforced; see through-bolting accessories and deck hardware rebedding. On a T-top, also check the frame itself (see tower hardware check).
On hydraulic systems, Rupp says to check fluid level and fittings regularly, especially before long trips, and Marlin adds checking the pump for leaks. Look for oil on the cylinders, hoses or deck. Rupp also recommends mounting the hydraulic power unit in a dry, ventilated, accessible spot, never in the bilge.
Rupp's hydraulic maintenance tips add a few owner-level checks:
- After offshore trips, extend the cylinders fully and rinse the inner sleeves, then treat the sleeve with a marine aluminum-safe lubricant a few times a year. Rupp says most cylinder problems come from skipping this.
- Check the reservoir monthly or before a long trip. What matters most is noticing fluid going down, which points to a leak. Do not overfill, and use the fluid type your maker specifies.
- Never use Teflon tape on hydraulic fittings; loose strands can clog valves.
- Once a year, check the electrical connectors at the power unit for corrosion and a firm, sealed fit.
- Cycle the system regularly, even in the off-season, to keep seals lubricated.
- Write down the serial numbers on the power unit and outrigger base for parts and tech support.
Marlin calls taking the outriggers off at least once a year a must, and suggests up to three times a year for people who fish a lot, or having them removed and inspected during the annual yard visit. It is a two- or three-person job:
- Tie the halyards back, remove the layout arms and loosen the base bolts.
- Pad tower legs and rod holders with pool noodles and tape, since the cables scrape.
- Tie a line around the pole near the first spreader to take its weight, and lower it slowly while someone keeps it clear of the tower and the boat.
If your poles are long or you are unsure, hire a rigger. Marlin also suggests keeping a spare bushing kit and a couple of spare cables aboard, and ordering parts with the set's serial number.
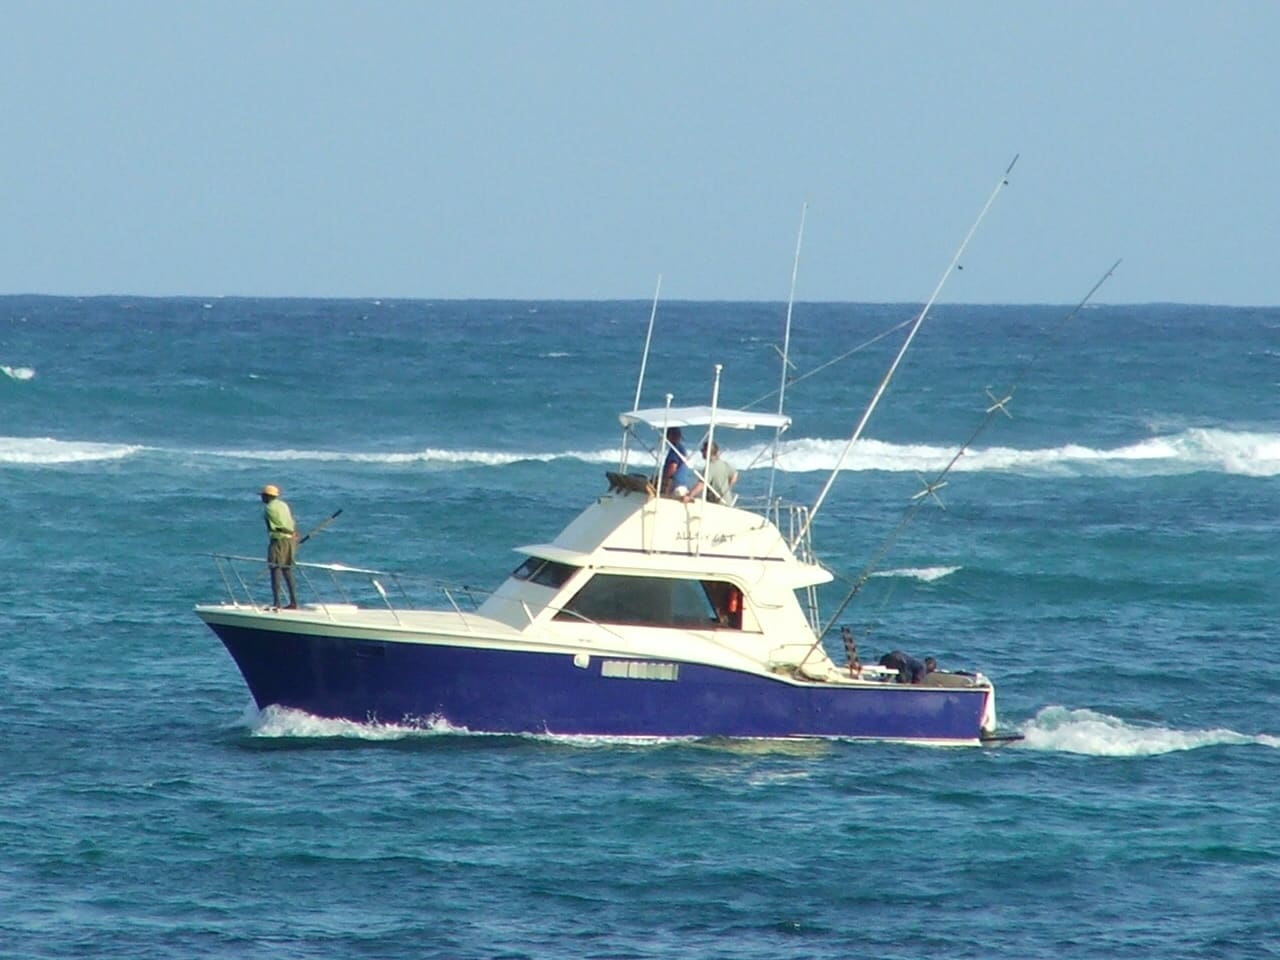
Outriggers in the fishing position. Photo: smudger888 / Wikimedia Commons · CC BY 2.0 - Under way: bring outriggers to the stowed position before running fast or in rough water, and make sure they are locked. A pole that pops out of its lock at speed can hit the boat or crew.
- Fishing: keep crew clear of the halyards and release clips when a fish hits, and never stand under a pole that is being raised or lowered.
- Storage and trailering: store poles in the down (lay-down) position and secure them so they cannot bounce or swing; Rupp sells lay-down hooks for this. Telescoping poles should be fully retracted. Tie halyards so they do not flog and chafe.
- Overhead: BoatUS reminds boaters to check clearance under power lines and bridges, and to look up at ramps before raising anything tall. If a pole ever touches a power line, BoatUS (citing the Coast Guard) says to stay in the boat, avoid touching metal and not jump into the water.
Common mistakes
- Skipping the freshwater rinse and finding seized locks and corroded pulleys next trip.
- Polishing anodized poles with an aluminum brightener or abrasive polish.
- Over-tightening halyards until the tips bend.
- Running fast with outriggers spread or not locked.
- Raising poles at the ramp without looking for power lines.
- Ignoring cracks in the hardtop or T-top around the base.
- Trying to lower long poles alone.
When to call a pro
- A pole is bent, cracked or badly pitted, or a spreader or cable is broken
- The base is loose, the top around it is cracking, or water leaks in under it
- Hydraulic outriggers leak, drift or will not hold position
- You need to remove, install or move outriggers, especially long poles or new bases
- Cables on spreader-type poles need replacing and tuning (Marlin suggests leaving tuning to pros)
- A pole has touched a power line
Tips
- Take a photo of how your rigging is set up before you change anything.
- Keep a re-rigging kit (line, crimps, loop protectors, beads, a spare clip and pulley) on the boat.
- Label which halyard goes to which position so crew rig the same way every time.
- Check halyards and clips during your pre-trip walkaround; it takes a minute.
- If you keep the boat on a lift or trailer outdoors, lower the poles between trips to cut sun and wind wear.
Official references
We read these to write this guide. Your engine's own manual always wins.
- Rupp Marine – 5 Most Frequent Outrigger Mistakes and How to Avoid Them
- Rupp Marine – Folding Lay-Down Hook
- Marlin – Outrigger Maintenance Tips and Techniques
- Marlin – Outrigger Maintenance (lowering and removing outriggers)
- Discover Boating – Re-rigging Outriggers
- BoatUS – Power Line Hazards
- Rupp Marine – Maintenance Tips for Keeping Your Rupp Hydraulic System in Top Shape
Safety: BoatMend is for information only and does not replace a certified marine technician. You are responsible for your safety and your boat. Read the full disclaimer.
Last updated 2026-10-25
Related guides
How to Inspect Wakeboard Tower, T-Top and Bimini Hardware
Towers, T-tops and biminis carry tow ropes, speakers, boards, electronics and wind loads, all on a handful of bolts. Learn how to check the welds, bases, backing plates, bolts, folding hinges and accessory loads before a crack or a loose bolt becomes an accident.
How to Clean, Protect and Inspect Stainless Steel Boat Hardware
Remove tea stains and rust from rails, cleats and fittings without scratching them, passivate stainless so it stays clean longer, understand why 304 and 316 behave differently, and spot the hidden crevice corrosion that weakens fittings from underneath.
How to Mount Rod Holders, Fish Finders, Cleats and Antennas Without Causing Leaks
Add accessories to your boat the right way, with through-bolts, backing plates, sealed core and proper wire pass-throughs, so every new hole stays dry and strong. Also learn where you should never drill.
How to Find and Fix Leaking Deck Hardware (Rebedding Cleats, Stanchions and Tracks)
Track down the cleat, stanchion base or track that is dripping into the cabin, then remove it, seal the deck core and bed it again with the right sealant so the leak stops for years instead of weeks. Catching it early protects the deck core from rot.
Marine Sealants Explained: 5200, 4200, 4000UV, Polysulfide, Silicone and Butyl Tape
Pick the right sealant before you bed a cleat, a through-hull, a window or a transducer. The wrong goo either leaks in a year or glues a part on so hard you damage the boat getting it off.
Basic Rope Work for Boat Owners - Eye Splices, Whipping and Sealing Line Ends
Learn the rope skills every owner uses: put an eye splice in three-strand dock or anchor line, stop line ends from unraveling with a whipping or by melting them, know when double-braid splicing is worth it or when to buy pre-spliced line, and inspect splices so you retire a line before it fails.
Saltwater Outboard Care: The After-Every-Trip and Monthly Routine
A simple routine that keeps salt from eating your outboard, built from Honda, Yamaha, Mercury and Suzuki advice. It covers flushing after every trip, washing, where to spray anticorrosion (and where never to), monthly greasing, anodes, and tilting up or storing out of the water.