Single-Line Reefing: Converting Slab Reefing and Leading Reef Lines to the Cockpit
Decide between two-line and single-line reefing, plan the blocks, clutches and line lengths, keep friction low enough that one person can actually pull the reef in, and test the new setup at the dock before you need it in a blow.
Time
10 h
Shop would charge
$800-3000
Applies to
All engines · Sailboat
Safety first: Do all the planning, drilling and test runs at the dock in light wind, never as a first try in a building breeze. A mainsail under load can snatch fingers into a block or clutch: keep hands clear of turning blocks and the winch drum while someone else is pulling. Don't go up the mast to fit hardware unless you know safe bosun's chair practice with a second halyard as backup; a rigger can do mast work. Every new hole in the deck is a possible leak into the core, so bed hardware properly (see the deck hardware rebedding guide).
Owners often ask
- Is single-line reefing worth it, or is there too much friction to pull the reef in?
- How long do my reef lines need to be if I lead them back to the cockpit?
- My boat has three reefs. Can single-line reefing work for all of them?
This guide walks you through it. Still stuck? Ask the AI Mechanic about your engine.
Tools
- Tape measure and a long light messenger line
- Drill, bits and a rivet gun suited to your boom (if adding boom hardware)
- Screwdrivers and wrenches for deck hardware
- Sealant and tape for any new deck holes
- Sail needle, palm and whipping twine (for soft attachments)
- Marker or whipping thread to mark the lines
Parts & supplies
- Low-stretch reefing line (not nylon), one per reef
- Ball-bearing blocks for the luff and leech cringles (or blocks sewn on by a sailmaker)
- Turning blocks for the mast base and boom
- Deck organizer and rope clutches near the cockpit winch
- Soft shackles or Dyneema loops and stainless rings for the cringle blocks
- Fasteners, backing plates and the isolating compound your hardware maker recommends for stainless on aluminum
Before you start
What you have now. Most older boats use simple slab (jiffy) reefing: someone goes to the mast, lowers the halyard, hooks the luff cringle over a reef hook (ram's horn) at the gooseneck and pulls down the leech with a line at the boom. SAIL notes many sailors still prefer this because it's simple and uses minimal line. See the reefing system care guide for how a slab reef works and how to service it.
The two ways to bring it to the cockpit.
- Two-line reefing: separate lines pull down the luff (tack) and the leech (clew) cringles, both led to the cockpit. SAIL lists the pros and cons: you can reef single-handed from the cockpit, it has less friction than single-line, but it needs turning blocks at the mast base and more clutches, and fills the cockpit with "spaghetti."
- Single-line reefing: one line per reef pulls down both the luff and the leech. SAIL calls it the most popular method today; its main drawback is the extra friction from all the turning blocks. Yachting Monthly, which notes single-line systems are now the norm on newer boats, agrees: friction at the luff can make it almost impossible to pull the leech down far enough to flatten the sail. SAIL dates the idea of reefing a slab main single-handed, with a ram's horn at the gooseneck and leech lines led through boom blocks, to rig builders in the early 1970s; single-line and two-line cockpit systems are later upgrades of that same slab reef.
Must-have before either conversion: the main halyard already led aft to the cockpit, a winch there to pull reef lines, and lazyjacks or a sail bag to catch the dropped sail. Good Old Boat notes that if the halyard isn't led aft, someone has to go forward anyway, and then a reef hook at the mast is the simpler choice.
How many reefs? SAIL notes single-line systems usually cover only the first two reefs, so a third reef is often a manual slab reef at the mast, exactly when you least want to be there. Its suggestion for bluewater boats: consider single-line on reefs 2 and 3 and keep the first manual, at the cost of longer lines.
Talk to your sailmaker and boom maker first. Many booms have factory single-line kits with internal blocks; some can't take one. The sail may need stronger cringles, blocks sewn on, or a different reef layout.
Steps
With the main hoisted at the dock, photograph the gooseneck, boom end, reef cringles, mast base and cabin top. Note the boom's sheaves and padeyes, what's inside the boom, the clutches and winches you already have, and any free spots for turning blocks. Count the reefs in the sail.
Pick based on how you sail:
- Two-line for lower friction and an easier pull, if you have room for more clutches and don't mind more lines in the cockpit.
- Single-line for one line per reef and fewer clutches, if you'll invest in low-friction blocks and a winch that can handle the load.
- Hybrid: SAIL's bluewater idea of single-line on the deeper reefs and a manual first reef, or a reef hook at the mast for the luff with only the clew line led aft (Good Old Boat says a hook-and-block arrangement cuts friction considerably).
SAIL and Good Old Boat describe the most common retrofit: the reef line is tied off near the aft end of the boom, goes up through (or around a block on) the leech cringle, back down to a turning block at the boom end, forward along or inside the boom to a block near the gooseneck, up through the luff cringle, down to a turning block at the mast base, and aft to a clutch and winch. Pulling the line first brings the luff down to the boom, then the load moves to the leech and pulls it down. Some boom makers use an internal sliding plate with two lines instead; SAIL warns that version has a lot of friction and can jam inside the boom if a line breaks.
Yachting Monthly and SAIL both say a line run straight through bare cringle rings adds a lot of friction. Fit blocks instead:
- Luff (tack) cringle: a ball-bearing block attached through the cringle. Yachting Monthly's method uses a stainless ring on the other side of the sail lashed to the block with thin Dyneema, plus an extra mast slider tied to the ring so the luff stays against the mast when you tension the foot. Choose blocks with covered sheaves so the sail can't get caught.
- Leech (clew) cringle: a lightweight soft-attach block on a short Dyneema loop. Choose the version with the highest working load.
- SAIL adds that blocks should have smooth covers so they don't chafe the sail, unless your sailmaker sews them on. Ask your sailmaker before fitting anything to the sail.
The clew line must pull the leech cringle both down and aft, or the foot of the reefed sail stays baggy; SAIL stresses this because a flat reefed sail heels the boat less. Rigging Doctor adds a routing tip: a clew line run the standard way can drag a fold of sail into the cringle and tear the leech, so it suggests running the line up on the same side as the boom block, over the leech and back down that side, with a chafe patch on the sail where the line rubs. The tie-off point or block on the boom should be a little aft of where the cringle lands. If the boom has no padeye or sheave in the right place, a rigger can add one; on an aluminum boom, use the right fasteners and isolating compound, and back them up where you can reach inside.
At the mast base, each line turns through a block and runs to a deck organizer, then to a rope clutch next to a cockpit winch. Keep the run as straight and fair as you can: every sharp turn adds friction. Line up new blocks so the line enters and leaves each sheave in the plane of the sheave. Through-bolt deck hardware with backing plates and bed it properly.
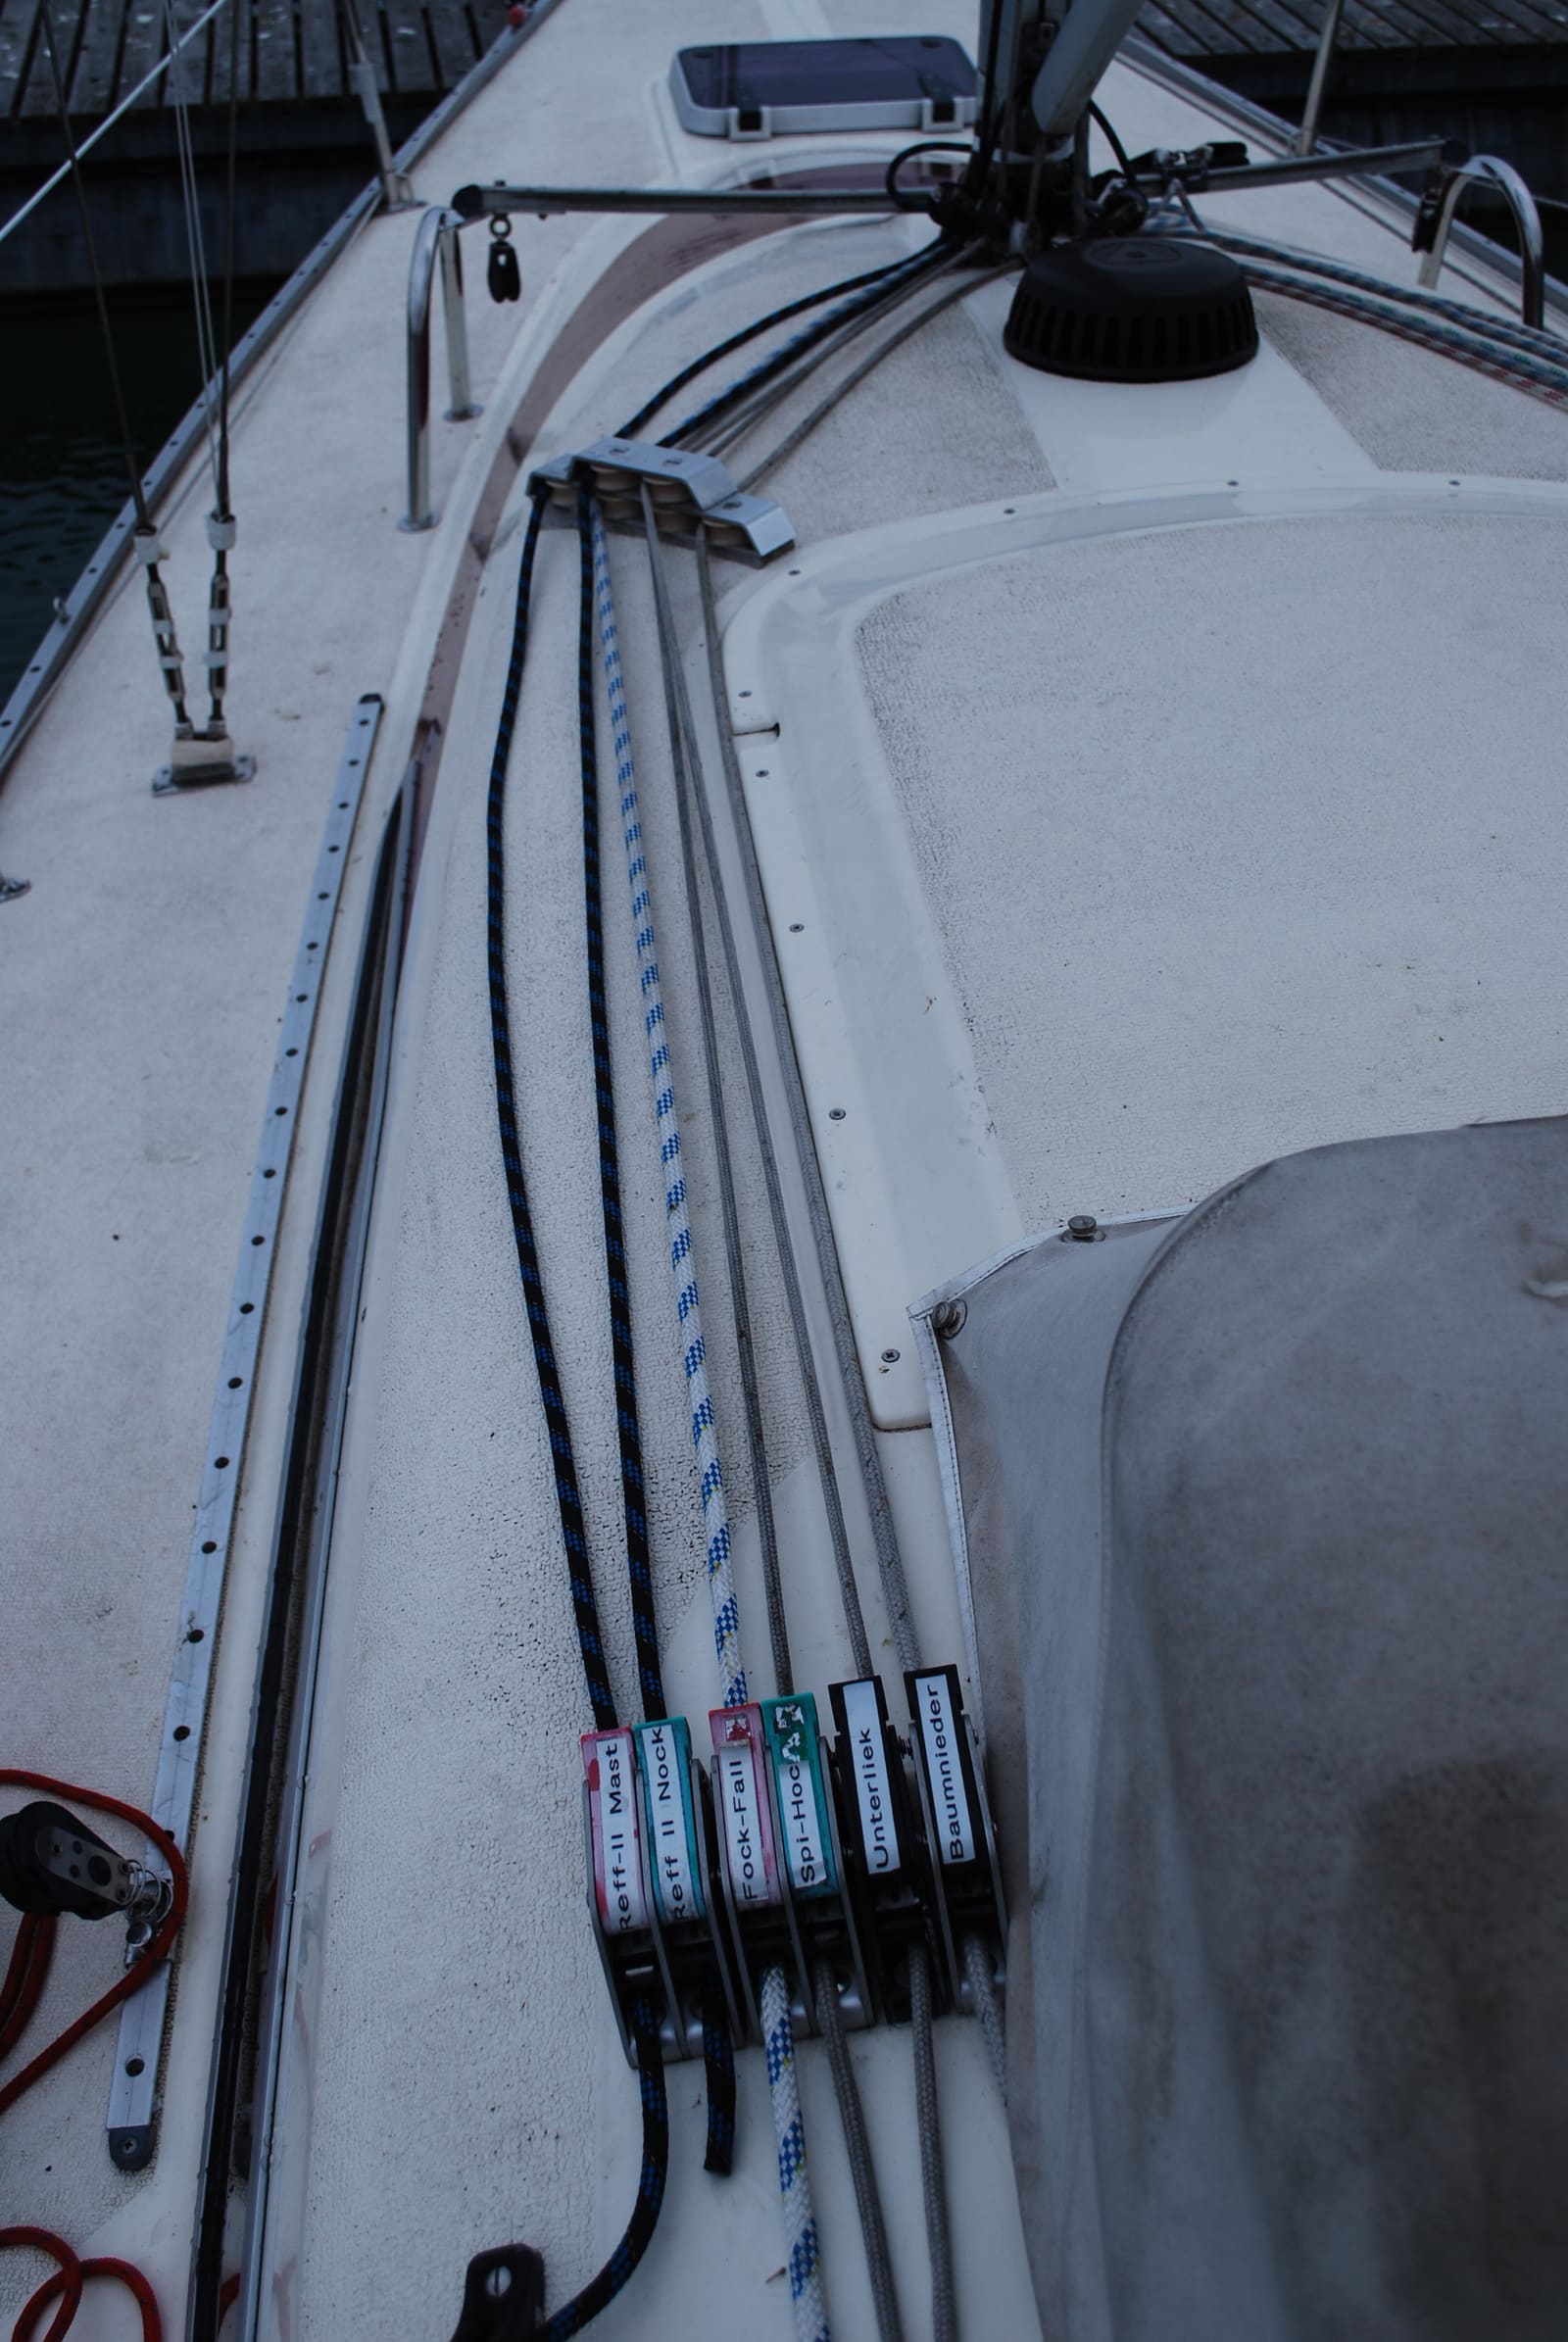
Lines turned at the mast base and led aft along the cabin top to rope clutches near the cockpit. Photo: PaterMcFly / Wikimedia Commons · CC BY 3.0 Don't buy line by guesswork. With the sail fully hoisted (when reef lines need the most length), run a light messenger line along the exact path each reef line will take, from the boom tie-off point to the clutch, then add enough to reach the winch with several turns and a working tail. Single-line reefs need much more line than a slab reef, and the deeper reefs need the most. Label each line by reef, and use a different color for each reef so the crew can't mix them up.
Good Old Boat says reef lines should be low-stretch, never nylon, so the reefed sail holds its shape. Pick a size that runs freely through every block and grips in your clutches (check the clutch's line range). Low-stretch, smooth line also reduces friction. See the running rigging guide for line types and wear.
On a calm day, reeve each line, tie off at the boom end (a bowline or splice around the boom or to a padeye, as the boom maker specifies) and take the tail to its clutch. Then follow Yachting Monthly's setup method:
- With the sail fully hoisted, mark each reef line at the clutch and at the front and back of the boom.
- Lower the sail to each reef, pull the reef line tight, and mark the mast or halyard so you know exactly how far to lower next time. Mark each reef line at the clutch too.
- Leave a little gap at the luff so the mast slides don't overload or the luff blocks don't jam together.
Yachting Monthly's sequence, which works for most boats: ease the vang (kicker) and, if needed, take up the topping lift; lower the halyard under control to the mast mark while pulling in the reef line at the same time so loose loops don't tangle; close the halyard clutch; winch the reef line tight and clutch it; then bring the halyard up the last bit to tension the luff, and reset the vang and topping lift. Do it several times at the dock and once out sailing in light air. If one person can't pull the reef in by hand at the dock, it will be worse in a blow: go back and cut friction.
SAIL points out that pairing a cockpit system with lazyjacks and a sail bag keeps the dropped sail off the deck and out of the helmsman's view. You can still tie the reef points, but that means going on deck; Good Old Boat notes the reef points only gather the loose sail and should never carry the load.
Check reef lines for chafe where they enter and leave the boom and blocks, spin every block, and test that clutches hold, as in the reefing system care guide. Log the new setup, line lengths and marks in BoatMend so a replacement line can be cut to length.
Common mistakes
- Running single-line reefing through bare cringles and cheap blocks. The friction can make the reef impossible to finish by hand.
- Buying line before measuring with the sail fully hoisted. It's always longer than you expect.
- A clew tie-off point in the wrong place, so the leech comes straight down and the reefed sail is baggy.
- Leading reef lines aft without leading the halyard aft. Someone still has to go forward.
- Never marking the halyard and lines, so every reef is guesswork.
- Hauling the reef line on the winch while the halyard is still loaded, which breaks mast slides or jams the luff blocks.
- No backup plan. If a single line breaks or jams inside the boom, SAIL notes you can end up unable to reef. Keep a reef hook at the mast or a spare line rigged, and know how to tie a reef down by hand.
When to call a pro
- New sheaves, padeyes or an internal reefing kit for the boom (a rigger or the boom maker)
- Blocks or reinforcements sewn onto the sail, or a reef layout change (a sailmaker)
- Mast work aloft, or new blocks at the mast base on a keel-stepped mast with wiring inside
- New deck hardware through a cored deck where you're unsure about sealing and backing plates
- The system still needs a winch handle and two people after you've cut the friction: have a rigger look at the leads
Tips
- Use one color per reef and label the clutches (REEF 1, REEF 2) so anyone aboard can reef at night.
- Practice a reef every few outings in light air so it's automatic when the wind comes up.
- A flake or bag at the clutch for the tails keeps the cockpit spaghetti under control.
- Reef early: if you're wondering whether it's time, it is.
Official references
We read these to write this guide. Your engine's own manual always wins.
Safety: BoatMend is for information only and does not replace a certified marine technician. You are responsible for your safety and your boat. Read the full disclaimer.
Last updated 2026-11-06
Related guides
How to Maintain Your Mainsail Reefing System and Practice a Reef at the Dock
Check the reef lines, blocks, hooks and cringles of a slab (jiffy) reefing system, keep in-mast and in-boom furling mains running smoothly, and practice tucking in a reef at the dock so it is quick and safe when the wind comes up.
Sail Care and Winter Storage: Rinse, Dry, Inspect, Fold and Store
Keep your sails out of the sun, rinse and dry them before they go away, catch small tears and rotten stitching early, and fold and store them so they come back in spring without mildew or hard creases. Good habits can add years to an expensive set of sails.
How to Service Sailboat Winches (Clean, Oil the Pawls, Grease the Gears)
Take your sheet and halyard winches apart, clean out old grease and salt, oil the pawls, lightly grease the gears and bearings, and put them back together. A serviced winch turns easily and, more importantly, its pawls catch every time so the drum can't spin backward under load.
Running Rigging Care: Inspecting Halyards, Sheets and Dyneema Lines
Check your halyards, sheets and control lines for chafe, sun damage, glazing and cover slip, wash them the right way, end-for-end them to spread the wear, and know when a line has to go. A halyard that parts drops a sail; a sheet that parts in a gust can be worse.
How to Find and Fix Leaking Deck Hardware (Rebedding Cleats, Stanchions and Tracks)
Track down the cleat, stanchion base or track that is dripping into the cabin, then remove it, seal the deck core and bed it again with the right sealant so the leak stops for years instead of weeks. Catching it early protects the deck core from rot.

Stepping and Unstepping a Sailboat Mast: Trailer Sailers and Yard Cranes
How to raise and lower a sailboat mast safely, whether you step a trailer sailer's mast at the ramp or help the yard crane do it, including power-line checks, mast wiring, basic tuning afterward, and when to leave the job to the yard.