Sailboat Keel Bolts and the Keel-Hull Joint: Signs of Trouble and What to Do
Learn to spot the warning signs at your keel joint and keel bolts, from a "smile" crack and rust weeps to wet bilges and loose nuts, and what to check after any grounding. Explains why re-torquing, pulling bolts and dropping the keel are jobs for a surveyor and a yard.
Time
1 h 30 min
Shop would charge
$400-1500
Applies to
All engines · Sailboat
Safety first: The keel holds a sailboat upright, and keel failures have capsized boats and killed crews. If you find fresh water pouring in near the keel bolts, a keel that moves, cracked floors or frames in the bilge, or a widening gap at the joint, do not go sailing. If you are afloat and taking on water, put on life jackets, start the pumps, head for the nearest safe dock and call TowBoatUS, Sea Tow or the Coast Guard on VHF channel 16 (or 911). Never crawl under a boat on stands that look unstable, and never try to loosen or remove keel nuts yourself.
Fuel smell, water coming in, CO alarm or smoke? Stop, get everyone in life jackets and call USCG on VHF 16 or 911. For a tow: Sea Tow or TowBoatUS.
Owners often ask
- My sailboat has a crack at the front of the keel joint (a "smile"). Is it serious?
- I touched bottom with my sailboat. Do I need to haul out and check the keel bolts?
This guide walks you through it. Still stuck? Ask the AI Mechanic about your engine.
Tools
- Bright flashlight or headlamp
- Inspection mirror
- Phone camera with flash
- Sponges, rags and a small pump to dry the bilge
- Plastic putty knife or thin flexible blade
- Plastic or rubber mallet (for sounding, out of the water)
- Notebook or BoatMend log
- Straight-sided clear jar (for a simple leak check)
Parts & supplies
- None for inspection; repairs are a yard job
Before you start
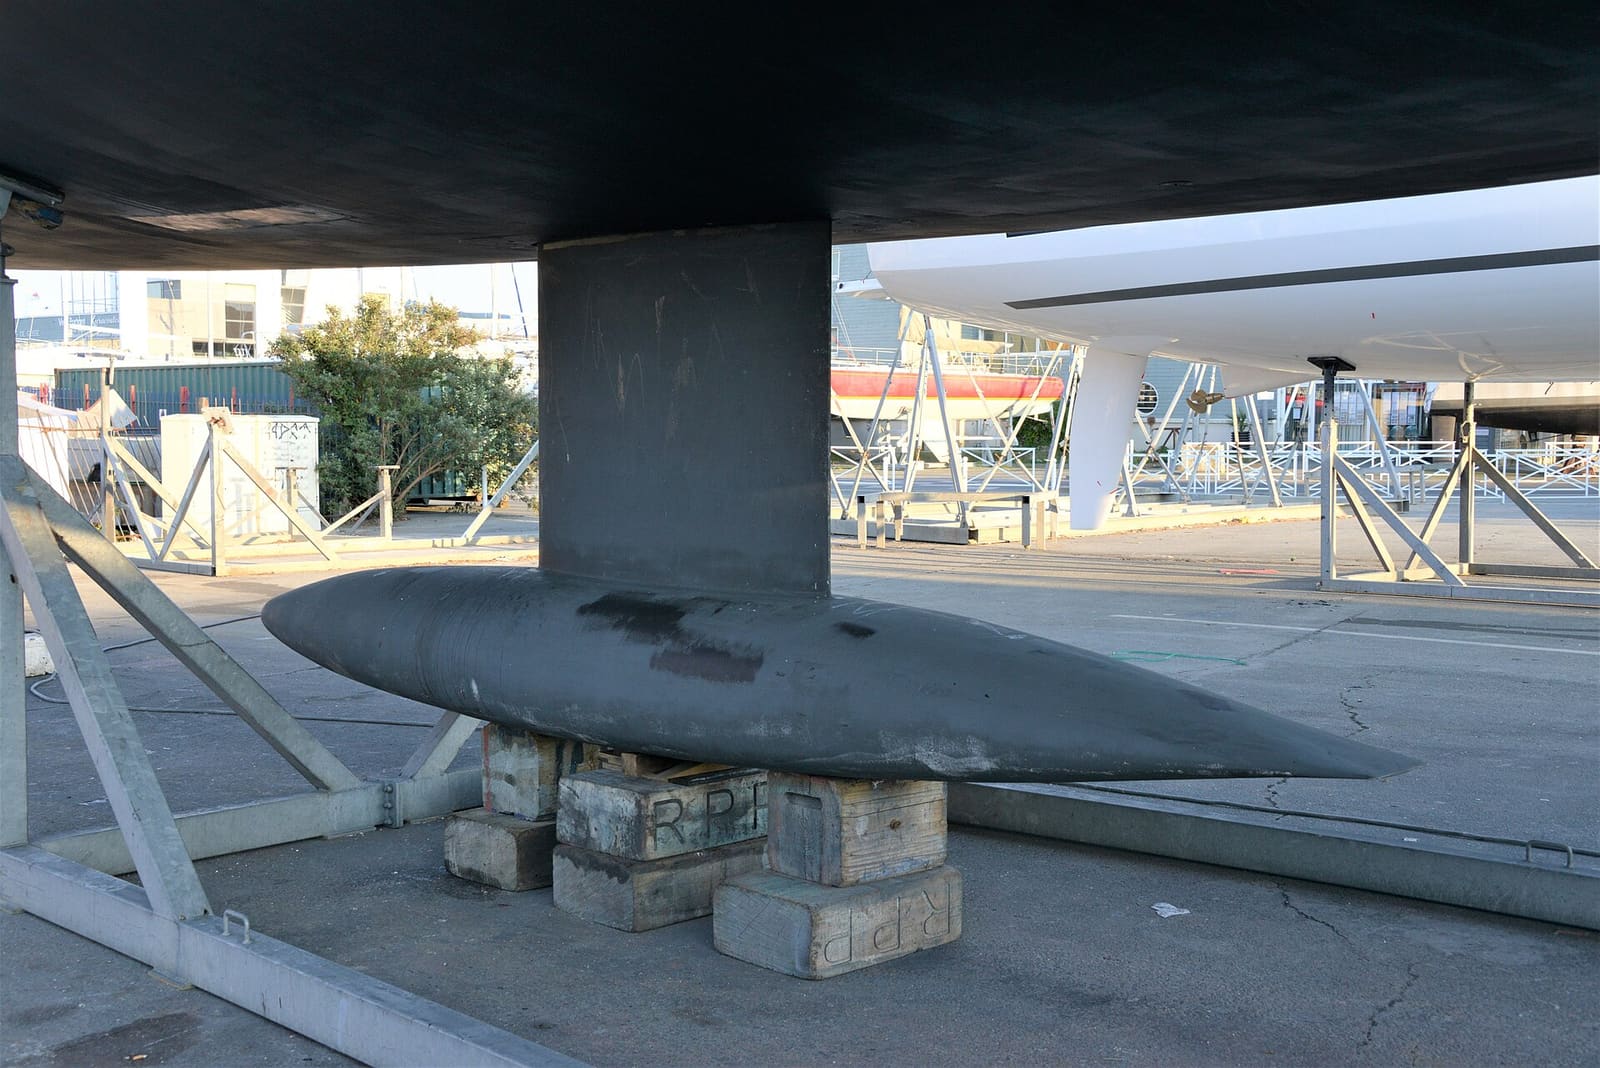
How it works. Most modern fin keels are a heavy casting of lead or iron bolted to a short "stub" or flat area on the bottom of the hull. Threaded keel bolts (or studs) run up from the keel through the hull, and nuts with backing plates hold them tight inside the bilge. On a typical fin keel there is one bolt at the front, pairs down the middle and one at the back. Some older and full-keel boats have the ballast sealed inside the fiberglass hull instead (an "encapsulated" keel) and have no external bolts.
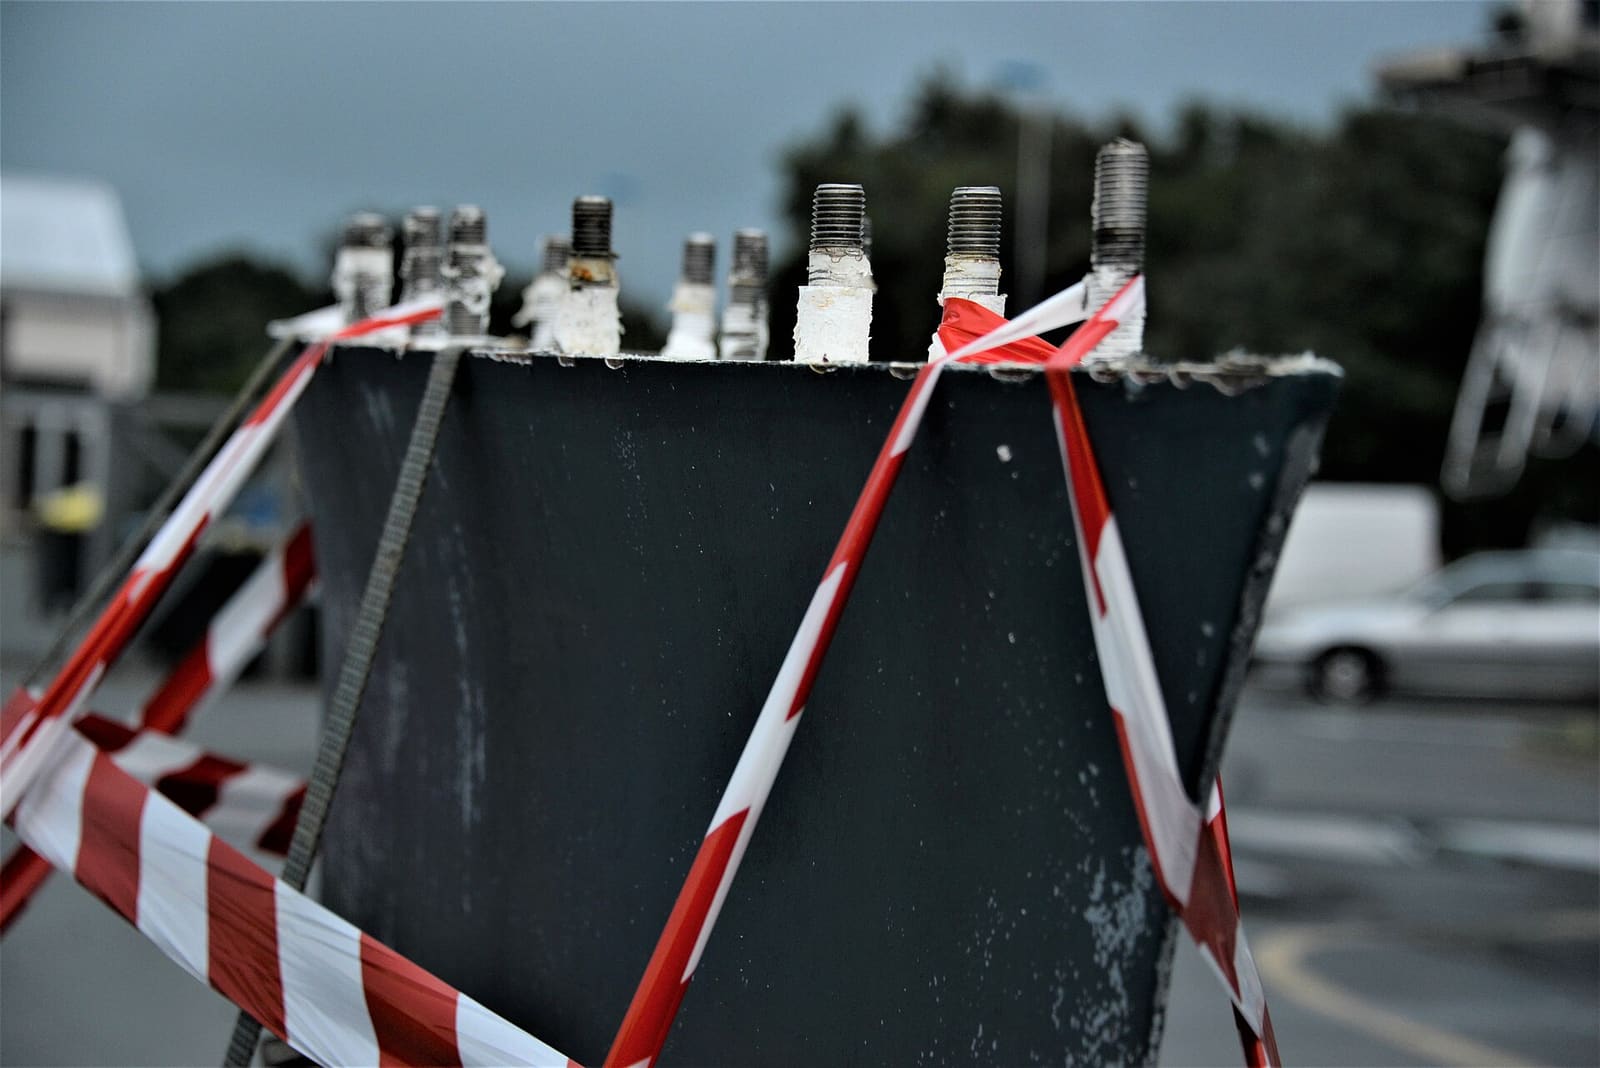
Why bolts get into trouble. Practical Sailor notes that keel bolts are very hard to fully inspect without some surgery, and that gaps at the joint let seawater sit around the bolts, where it can cause crevice corrosion. Stainless steel bolts can corrode badly when they sit wet in stagnant seawater with no oxygen, and the damage can be hidden inside the hull or keel. Mild steel and galvanized bolts rust; bronze bolts can be damaged by overtightening.
What this guide covers. Things an owner can safely look at: the outside joint when the boat is hauled, the bolts and the structure around them in the bilge, and a sensible routine after a grounding. It does not cover re-torquing, pulling bolts or dropping the keel. Those need a surveyor's assessment, the right specs and yard equipment.
When to do it. Every haul-out, every spring commissioning, after any grounding or hard bump, before buying a used sailboat, and anytime you see a new leak in the bilge. Practical Sailor's advice is a close look at each haul-out or after a grounding, and it notes that on boats more than about 20 years old, keel bolts will likely come up in the pre-purchase survey.
Steps
Find out from the owner's manual, the builder or an owners' association what keel your boat has (fin, bulb, wing, full or encapsulated), how many bolts it uses and what they are made of. Owners' groups often know about common keel problems on your model and sister ships. Write the bolt count and layout in BoatMend so you can check that every nut is accounted for.
Look along the keel-hull joint on both sides and at the front and back. A fine hairline crack in the bottom paint at the joint is common. Things to note and photograph:
- A "smile": a crack or gap at the front of the joint that curves like a smile. It often means the keel is flexing.
- A gap you can slide a thin plastic blade into, especially if it is wider than last season
- Rust stains weeping from the joint, which suggest water is reaching the bolts
- A joint that stays wet long after the rest of the bottom has dried
- Cracks in the hull itself, forward or behind the keel
Then step back. In its buyer's self-survey article, BoatUS suggests standing directly in line with the bow and the rudder and sighting along the keel from both sides: the rudder should line up perfectly with the keel. A keel or rudder that looks canted to one side can point to a bad repair, a hard grounding or a building defect.
SAIL Magazine points out that a separation can close up once the keel carries the boat's weight on the blocks, and Yachting World says gaps and movement are easier to see with the boat hanging in the slings. Ask the yard if you can look at the joint during the lift.
Look for gouges, flattened spots or missing chunks on the leading edge and the bottom of the keel, which tell you it has hit something. On iron keels, look for rust blisters. Note the location and size of any damage with a photo and a ruler in the frame.
Inside the boat, lift the floorboards over the keel and pump and sponge the bilge dry. You need a dry bilge to see new water coming in. Find every keel nut and backing plate. Some boats have the nuts covered with resin or filler; leave those caps alone unless a surveyor asks to see under them, but note any that look discolored or cracked.
With a bright light and a mirror, look at each bolt end:
- Heavy rust, flaking or crumbling bolt ends
- Rust stains or weeping around a nut or backing plate
- Backing plates that are bent, cracked or sinking into the fiberglass
- Cracked or crushed laminate under the plates (on cored or light hulls, the core can crush and let the nut loosen)
- More thread showing above a nut than last year, which can mean a bolt is slowly pulling out of the keel
Do not put a wrench on the nuts to "check if they're tight." Tightening a corroded or pulled bolt can hide a problem or make it worse, and SAIL warns against re-torquing bolts that show signs of water getting in.
The keel's load is spread through the hull by floors, frames or a molded "grid" bonded into the bottom. Look closely for:
- Cracks in the floors or grid, especially across the top or at the corners
- White stress lines or cracks in the paint or gelcoat inside the bilge
- Places where the grid has peeled away from the hull (a gap or a hollow sound when tapped)
- Cracks around the mast step, which often sits right above the keel
On many production boats the grid is hard to see. Do what you can safely reach and note the rest for a surveyor.
If the bilge fills with seawater over a few days or weeks and you cannot find another source (stuffing box, through-hulls, deck leaks, the water tank), the keel bolts or joint may be leaking. SAIL Magazine describes a simple check for when the boat is hauled: put some fresh water in the keel sump, stand a straight-sided jar of water in it, and mark both water levels. Over a day or two the jar only loses water to evaporation. If the sump level drops more than the jar, water is escaping into the joint or bolt holes, which means seawater can get in the same way when the boat is afloat.
Salty water in the bilge of a saltwater boat, with no other source found, is another strong hint. Report either finding to a surveyor.
BoatUS's accident investigator explains that when a deep fin keel hits something hard, the back of the keel tends to be shoved up into the hull while the front pulls down, which can damage the hull, the keel sump, the grid and even the mast step and rigging. Damage may not show on the outside. After any grounding beyond a light touch in soft mud:
- Check the bilge for new water immediately, and keep checking every hour on the way in.
- Lift the floorboards over the keel and look for cracked floors, grid bonds that have let go, and cracks around the bolts and mast step.
- Check the rudder, steering and engine mounts too.
- Watch the bilge closely for the next few days. Boats have sunk at the dock hours after what felt like a bump.
While you're still stuck, BoatUS's advice on getting a sailboat off a shoal includes a warning that matters here: spinning the boat hard to point back toward deep water can damage the rudder, especially a deep spade rudder. If keel bolts were loosened or the hull was holed and water is coming in fast, man the pumps and call for help right away.
Yachting World's insurance experts advise hauling the boat and inspecting it out of the water after any grounding, however minor, and say a diver's look is not a substitute. BoatUS's investigator says a sailboat that has taken more than a bump needs a professional inspection. Call your insurer early: many policies, including BoatUS's, cover a preventive haul-out and inspection after a grounding, and waiting can complicate a claim.
Depending on what they find, options may include:
- Monitoring only: a cosmetic hairline crack with no water, rust or structural damage
- Fairing and resealing the joint: cleaning out the gap and filling and sealing it, after the cause of movement is understood
- Re-torquing: only after the bolts and structure are judged sound, using the builder's spec and procedure
- Pulling a bolt for inspection, often possible on iron keels with through-bolts, or other non-destructive checks
- Dropping the keel to inspect, reseal and rebed it, or to repair the hull and grid
- New or "sister" bolts added beside old ones, or full bolt replacement
BoatUS's investigator notes that if the hull and sump around the joint are badly damaged or delaminated, the keel has to come off, but if there is no sign of damage in the keel bolt areas, dropping it is often unnecessary. Yachting World also advises not to draw the bolts and lower the keel without evidence of damage, corrosion or loosening. Practical Sailor describes keel-drop work as potentially dangerous and best done with a travel lift or crane.
Photograph the joint and every keel nut each haul-out, from the same angles. Note the date, the boat's condition and anything that changed. Store survey reports and repair invoices in BoatMend. Good records make the next survey faster, help your insurer, and add value when you sell.
Common mistakes
- Filling a smile crack with fairing compound or sealant and calling it fixed. SAIL warns that covering a crack and retorquing can hide damage underneath.
- Tightening keel nuts "just to be safe" without knowing why the joint moved or what the bolts look like.
- Assuming no visible damage means no damage after a grounding. Much of it is inside.
- Ignoring rust weeps from the joint season after season.
- Not calling the insurer after a hard grounding, then finding a claim is harder to make later.
- Painting over discolored resin caps on the keel nuts instead of letting a surveyor look.
When to call a pro
- Any new or widening gap, rust weeping, or a joint that stays wet out of the water
- Unexplained seawater in the bilge near the keel
- Cracked floors, grid, frames, mast step or laminate near the bolts
- Heavily corroded, crumbling or wet bolt ends, or more thread showing than before
- After any real grounding, before the next sail
- Before buying a used sailboat: ask the surveyor specifically about the keel and bolts
- Any re-torquing, bolt pulling, bolt replacement or keel drop
Tips
- Ask the yard to pause the lift for a minute so you can look at the joint while the keel hangs free.
- Keep a clean, dry keel sump. It makes new water easy to see and slows corrosion.
- Know your charted depths and your boat's draft. The best keel repair is the grounding you avoid.
- When buying a boat with a known smile on that model, ask the seller for past survey and repair records. On a viewing, BoatUS suggests lifting the floorboards to look at the keel nuts: you'll usually see only the nuts and a little thread, but heavy corrosion there can mean costly bolt replacement.
- If you plan to race offshore, read the event's safety rules early. Practical Sailor reports that offshore racing categories now call for a keel inspection, while near-shore (Category 4) events do not. A recent inspection report also helps with insurers and buyers.
Official references
We read these to write this guide. Your engine's own manual always wins.
- Practical Sailor – Keel Bolt Inspection and Repair
- SAIL Magazine – How Secure is Your Keel?
- BoatUS Magazine – What Happens When You Run Aground And How To Avoid It
- Yachting World – Keel failure, shocking facts (inspection advice)
- BoatUS Magazine – Be Your Own Surveyor (2021)
- BoatUS Magazine – What To Do If Your Sailboat Goes Aground
Safety: BoatMend is for information only and does not replace a certified marine technician. You are responsible for your safety and your boat. Read the full disclaimer.
Last updated 2026-10-24
Related guides
What to Do When Your Boat Is Taking On Water: Emergency Steps and Prevention
A step-by-step emergency plan for water coming into the boat - life jackets on, call for help early on VHF 16, find and slow the leak, pump, and head for shallow water if needed - plus the maintenance checklist that prevents most sinkings.
How to Inspect a Used Boat Before You Buy
A step-by-step checklist for looking over a used boat, from paperwork and the hull ID number to the transom, engine, compression test, sea trial and trailer. Know what to check yourself, what the red flags mean, and when to pay a marine surveyor.
How to Prepare Your Boat for an Insurance or Condition Survey
Get ready for a marine survey your insurer or lender asked for: what a SAMS or NAMS surveyor looks at, the common findings you can fix beforehand (hose clamps, seacocks, bilge, fire extinguishers, wiring), the paperwork to have ready, and how to handle the recommendations afterward.
Storing a Boat on Stands and Blocks: Keel Blocking, Stand Placement and Safety Chains
Learn how a boat should sit on keel blocks and boat stands for winter or a haul-out, so you can check the yard's work, spot dangerous setups, and keep your boat from settling, distorting or falling over in wind, rain or a storm.
Launch Day and Haul-Out Checklist for Trailer Boats
A step-by-step checklist for getting your boat off the trailer and back on again safely and quickly, from the drain plug and tie-downs to the blower and ramp etiquette. Following it in order prevents the classic mistakes that sink boats and back up the ramp.
Bottom Paint (Antifouling): Do You Need It, Which Type, and How to Repaint
Learn whether your boat needs antifouling bottom paint, how ablative and hard paints differ, and how to prep and roll on a fresh coat safely, without poisoning yourself or the water and without ruining an aluminum hull.
Hull Blisters (Osmosis): How to Tell Cosmetic Pimples From Serious Pox
Learn what osmotic blisters are, how to inspect a fiberglass bottom at haul-out, which blisters you can fix yourself with epoxy, what moisture meter readings can and can't tell you, and when to hire an independent surveyor.
Stepping and Unstepping a Sailboat Mast: Trailer Sailers and Yard Cranes
How to raise and lower a sailboat mast safely, whether you step a trailer sailer's mast at the ramp or help the yard crane do it, including power-line checks, mast wiring, basic tuning afterward, and when to leave the job to the yard.
Rudder, Rudder Bearings and Steering Gear Inspection (Sailboats and Inboards)
Check your rudder for play, water inside the blade and stock corrosion, inspect the rudder tube and its seal, and go over cables, sheaves, quadrant and stops so the steering does not fail when you need it. Includes how to find, fit and practice with the emergency tiller.