Replacing a Built-In Boat Fuel Tank: What's Involved and Why It's Usually a Pro Job
A leaking built-in gas tank is a fire and explosion risk that has to be fixed, not patched. Learn the signs a tank needs replacing, why foamed-in aluminum tanks corrode, what a compliant replacement tank and label look like, how access, grounding, hoses, vents and foam should be handled, and how to plan and check the work.
Time
8 h
Shop would charge
$1500-6000
Applies to
Outboard, Sterndrive (I/O), Gas inboard, Jet boat, Marine diesel · Fishing boat, Bowrider / runabout, Center console, Cabin cruiser, Jet boat, Yacht
Safety first: An empty or half-empty gas tank is more dangerous than a full one, because it is full of explosive vapor. If you smell gas or see fuel in the bilge, stop using the boat: no engine, no switches, no power tools, ventilate, get people off and away, and call a marine technician. On the water, shut down, put on life jackets and call the USCG on VHF 16 or 911. Draining, cutting around and removing a gasoline tank should be done by a qualified marine technician with the right pumps, containers and ventilation. A bad fuel connection in a closed bilge can lead to a fire or explosion.
Fuel smell, water coming in, CO alarm or smoke? Stop, get everyone in life jackets and call USCG on VHF 16 or 911. For a tow: Sea Tow or TowBoatUS.
Owners often ask
- The aluminum gas tank under my deck is leaking. Can it be patched, or does it have to be replaced?
- Should a new fuel tank be foamed in like the original one?
This guide walks you through it. Still stuck? Ask the AI Mechanic about your engine.
Tools
- Flashlight and inspection mirror
- Phone camera (to document the old tank, label and every connection)
- Tape measure (access opening and tank compartment)
- Fire extinguisher within reach
- Notebook for quotes and the old tank's label details
Parts & supplies
- Replacement tank with a full federal label (for gasoline), sized for your compartment
- USCG Type A1 fuel hose (and the correct fill and vent hose), marked on the hose
- Corrosion-resistant hose clamps (two on each fill hose connection)
- New sending unit and gasket matched to your fuel gauge
- Non-moisture-absorbing pads and hold-down straps or chocks
- Ground (bonding) wire and terminals
Before you start
This guide explains the job so you can recognize when a tank needs replacing, get honest quotes, ask the right questions and check the finished work. It is not a step-by-step for doing the fuel work yourself. If you're handy, there are parts you can take on (removing seats and hatches, documenting, some fiberglass prep), but the fuel system itself is best left to a pro.
Signs a built-in tank needs replacing:
- A gas smell that keeps coming back, or a sheen of fuel on bilge water.
- Wet fuel stains at a seam or around the bottom of the tank.
- White, powdery corrosion, pitting or blisters on an aluminum tank, or soaked foam around it.
- Water in your fuel samples that keeps coming back after you've fixed the fill cap O-ring and vent (see the fuel tank inspection guide).
- A swollen, cracked or soft plastic tank, or an old fiberglass tank with ethanol problems.
Who the federal rules cover: The Coast Guard fuel system rules in 33 CFR 183 Subpart J apply to boats with gasoline engines for propulsion or power, except outboard engines. Outboard boats with built-in tanks aren't covered by that subpart, but replacement marine tanks are commonly built and labeled to the same standard, and you should insist on that for any boat. Diesel tanks aren't covered either; the same good practices still apply.
Steps
Fuel smells also come from hoses, the fill, the vent, the sender gasket and the engine. BoatUS describes how a technician confirms a tank leak: drain it, pressurize it slightly with air and watch for a pressure drop. Have that test done before you spend money on a tank, and ask the tech to check the hoses and fittings at the same time (see the fuel smell diagnosis guide).
Aluminum is the most common material for built-in tanks, and it usually fails from the outside. BoatUS explains that many builders poured flotation foam around the tank, and moisture trapped between the foam and the tank walls can eventually corrode through the metal. Federal rules for foam-encased metal tanks (33 CFR 183.552) say water must not collect between the foam and the tank or be held against it, but on older boats it often is. BoatUS also notes aluminum tanks are rarely repairable: once corrosion causes a leak, the tank is replaced. Welding or epoxy patches are not a fix.
Before anything is removed, photograph:
- The tank label. Federal rules (33 CFR 183.514) require the maker's name and address, month and year built, capacity in US gallons, material, the test pressure, the model number if any, and the statement "This tank has been tested under 33 CFR 183.510(a)."
- The tank's position, the fill, vent and feed hose routing, the sender wiring, the ground wire, the anti-siphon valve and the straps or chocks.
- The compartment's measurements, and the size of any hatch or access plate above it.
This helps you order the right replacement and check that everything goes back correctly.
Be realistic before you start. BoatUS points out that some builders include large access plates for tank removal, but more often replacing a tank means cutting the deck or the side and then doing extensive fiberglass repair. On an older, low-value boat the bill can approach or pass what the boat is worth. Get at least two written quotes that spell out: tank, hoses, sender, fiberglass work, deck refinishing, and what happens if they find rotten stringers or soaked foam when the deck comes up.
- Aluminum (custom or stock): can be built to the exact shape of the old one. To last, it needs to sit so it can drain and dry (step 8).
- Rotomolded polyethylene (plastic): BoatUS notes these have become popular because they resist corrosion and leaks, which makes them a good choice for older boats, though they have their own drawbacks, such as limited shapes and sizes. Makers such as Moeller sell molded replacement tanks in standard sizes for below-deck installation. Yachting Magazine adds that plastic tanks can swell slightly, so the mounting must leave room for that; that wide molded baffles can make a plastic tank hold less than an aluminum tank of the same outside size; and that choices get scarce for very large tanks, where custom aluminum is often the only fit.
- Steel: federal rules (33 CFR 183.512) ban terneplate tanks, ban black iron or carbon steel tanks unless galvanized inside and out, and ban ferrous tanks encased in foam or fiberglass.
- Fiberglass: rarely used for replacements; older fiberglass tanks can have ethanol compatibility problems (see the ethanol fuel care guide). BoatUS's lab tests on gasoline tanks from the 1960s and 1970s found they had lost up to about 40 percent of their strength after ethanol blends arrived, with resin leaching into the fuel and leaving black deposits on intake valves; most reports involved fiberglass gas tanks built before the mid-1980s. BoatUS also reported that resin makers said simply coating the inside of an old tank is unlikely to work, and that tank replacement was not covered by insurance. If your boat has an original fiberglass gas tank, that's a strong reason to plan for replacement.
For gasoline, buy a tank with a complete federal label. Size it to fit the compartment with room for the fittings, pads and straps, not just the old gallon number.
For gasoline boats with installed tanks, the EPA's evaporative emission rules (40 CFR 1060) phased in low-permeation fuel lines from 2009, diurnal (venting) controls such as a carbon canister from July 31, 2011, and low-permeation tanks from model year 2012. If your boat's original tank was certified to those rules, 40 CFR 1060.601 makes the replacement tank and lines subject to the same requirements. In plain terms: on a newer boat, buy a certified replacement and keep the vent system and canister as designed. Your installer and tank supplier can confirm what applies to your boat's model year.
This is where the pro earns the money:
- The tank is pumped out completely into approved containers, the battery is disconnected and the area is ventilated before any tool comes near it. Sealed, explosion-proof lights only.
- Hoses, the sender wire and the ground wire are disconnected and capped.
- If there's no big enough hatch, the deck is cut along a planned line so the piece can be reused or replaced and glassed back in.
- Foam stuck to the tank is cut away. Yachting Magazine notes that if a foamed-in tank has been leaking, the foam is probably soaked with fuel; it's hazardous and has to come out with the tank. On many boats this is also the first chance in years to look at the stringers and the foam. If either is wet or rotten, it changes the job (see the transom and stringer rot guide and the waterlogged flotation foam guide).
How the tank sits decides how long it lasts. The federal installation rules (33 CFR 183.550 and 183.552) include:
- The tank must not be part of the boat's structure, and must not support a deck or bulkhead.
- It must not move more than 1/4 inch in any direction at its mounting.
- Straps, chocks and supports that aren't part of a metal tank must be insulated from it by non-moisture-absorbing material.
- Water must drain off the top of a metal tank when the boat floats normally.
- Foam must not be the only support for a metal tank, and foam used around metal tanks must meet specific material standards (33 CFR 183.516).
- On foamed-in tanks, the connections, fittings and labels must stay accessible.
Yachting Magazine reports that most tank makers don't recommend foaming a new tank in place even if the boat was built that way, and some say doing so voids the tank warranty. Many technicians now set aluminum tanks on non-absorbent pads with straps, without foam, so air can circulate and water can't sit against the metal. That avoids the problem that killed the old tank. For a plastic tank, follow the tank maker's installation instructions on supports and clearance. Ask your installer which method they'll use and why. If foam is removed, your installer should check that the boat's flotation isn't affected (flotation foam serves a separate safety purpose on many small boats).
- Every opening into the tank must be at or above the top of the tank (33 CFR 183.518); no bottom drains.
- Every fuel fitting, joint and connection must be reachable for inspection and removal without removing permanent boat structure (33 CFR 183.554). If the deck was cut, ask for a deck plate or hatch over the tank fittings and sender so the next check doesn't need a saw.
Static electricity can ignite fuel vapor during fueling. Federal rules (33 CFR 183.572) require every metal part of the fuel fill system and tank that touches fuel to be grounded, with less than 100 ohms resistance to ground. In practice the tank's ground terminal and the metal deck fill are wired to the boat's bonding system. Make sure the ground wire is reconnected (or replaced if corroded) and ask the installer to check it with a meter (see the bonding system guide).
A new tank deserves new hoses; old ones are usually as tired as the tank. Federal rules include:
- Feed and pump-to-carburetor hose: USCG Type A1 where required (33 CFR 183.558), marked on the hose.
- Fill and vent hoses: A1 or A2, or B types only under specific conditions.
- Fill hose connections: a swaged sleeve, a sleeve with insert, or two adjacent metal hose clamps (33 CFR 183.564).
- All clamps: corrosion-resistant, placed past the bead or over the barbs, and not relying only on spring tension (33 CFR 183.532 and 183.560).
- Vent: must have a cleanable flame arrestor and must not let overflow fuel into the boat (33 CFR 183.520).
- Anti-siphon protection on the feed line where the line runs below the tank top (33 CFR 183.568; see the anti-siphon valve guide).
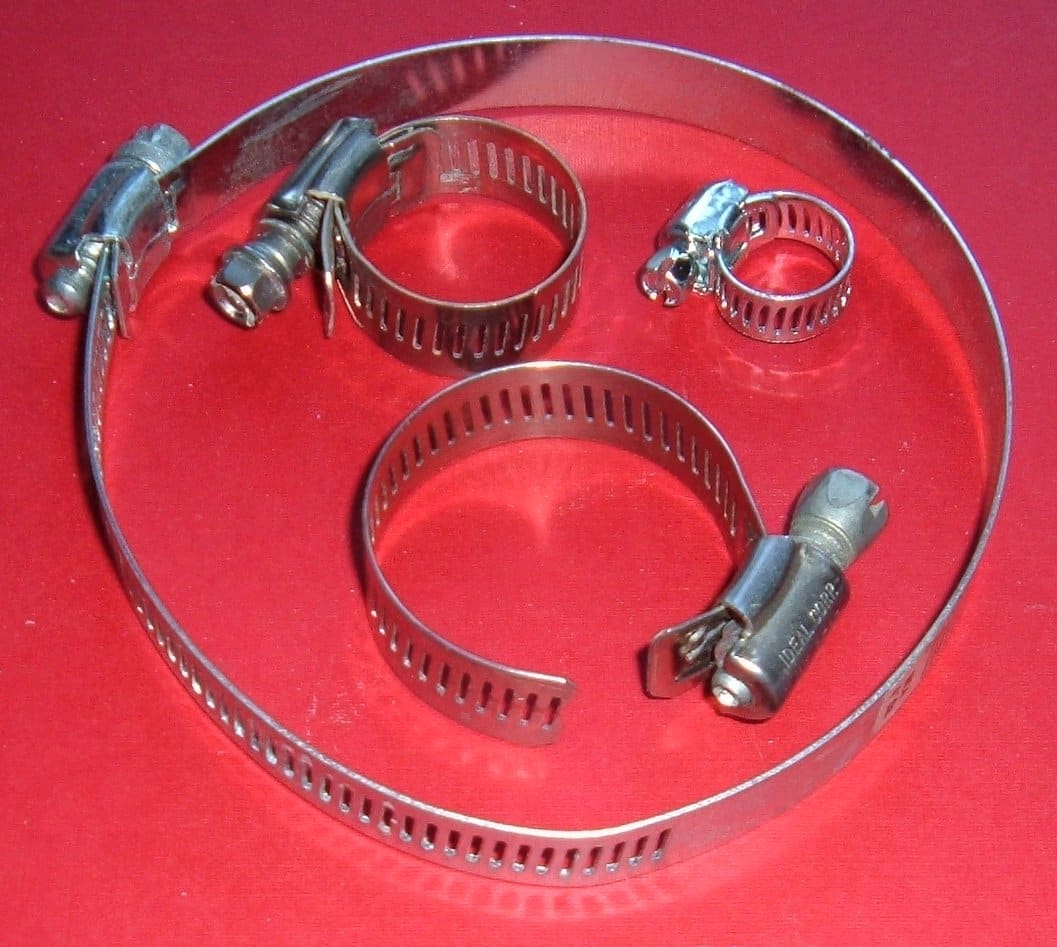
Screw-band hose clamps like these are common on fuel hoses. For a boat, choose corrosion-resistant (stainless) clamps sized to the hose, and use two on each fill hose connection. Photo: ArnoldReinhold / Wikimedia Commons · CC BY-SA 3.0 See the fill and vent hose and fuel line guides for details.
Use a new sender (with a new gasket) that matches your gauge's resistance range and the new tank's depth. A mismatched sender gives wrong readings (see the fuel gauge sender guide).
Before the deck is glassed back or hatches are screwed down, the installer should leak-test the tank connections and hoses following the tank maker's instructions. A common method, as Yachting Magazine describes, is to pressurize the tank slightly with air (to the low pressure the tank maker specifies, never more), brush soapy water on every connection and look for bubbles, then reseat and retest any that leak. Then:
- Add a small amount of fuel first, wait, and check every fitting, hose and seam with a dry rag and your nose.
- Run the blower for at least four minutes before starting, check the fume detector if you have one, and start the engine only when there's no smell.
- After the first few outings, look and sniff again.
File the invoice, the new tank's label photo, the hose markings and photos of the installation before the deck went back. Buyers, surveyors and insurers will ask, and BoatUS notes that a known tank issue is one of the first things buyers of older boats look at.
Common mistakes
- Patching a leaking aluminum tank with epoxy or a weld and putting it back.
- Re-foaming a new aluminum tank in solid foam the same way the old one failed.
- Buying a tank by gallons only and finding it won't fit through the opening or under the deck.
- Reusing old fuel hoses and clamps with a new tank.
- Forgetting to reconnect the ground wire to the tank and fill.
- Burying the tank fittings under a glassed-over deck with no access plate.
- Using an uncertified tank on a newer boat with an EPA low-emission fuel system, or deleting the carbon canister.
- Starting the job without a plan for rotten stringers or wet foam found under the deck.
When to call a pro
- Any fuel leak, fuel smell or fuel in the bilge: stop using the boat and call a marine technician.
- Draining, removing and installing the tank, and all fuel hose and fitting work: a qualified marine technician (ABYC-certified technicians are trained on fuel systems).
- Cutting and rebuilding the deck: a fiberglass repair shop.
- Wet foam, soft decks or rotten stringers found during the job: a surveyor or fiberglass shop before anything is closed up.
- Before buying a used boat with a suspected tank problem: a marine surveyor and a written repair quote.
Tips
- Ask the shop to keep the old tank for you to see; the corrosion usually explains everything.
- Have the deck cut where a hatch or deck plate can go in, so future inspections are easy.
- Replace the fill cap O-ring and clean the vent screen at the same time; they're the usual way water gets in.
- If the boat is old and the quote is higher than the boat is worth, selling it as-is with full disclosure of the tank problem is an honest option (see the guide on getting rid of an old boat).
Official references
We read these to write this guide. Your engine's own manual always wins.
- eCFR – 33 CFR Part 183 Subpart J, Fuel Systems (tanks, labels, foam, installation, grounding, hoses)
- eCFR – 40 CFR 1060.601, Replacement fuel tanks and fuel lines (EPA evaporative rules)
- eCFR – 40 CFR 1060.1, Which products are subject to EPA evaporative requirements
- BoatUS – The Value Proposition (fuel tanks on older boats, access and replacement)
- BoatUS – How To Stop Water From Entering Your Boat Fuel (foam, corrosion, pressure test)
- Moeller Marine Products – Fuel system products (replacement tanks)
- BoatUS – Results Of Fuel And Fiberglass Gas Tank Tests
- Yachting Magazine – Replacing Fuel Tanks for Boats
Safety: BoatMend is for information only and does not replace a certified marine technician. You are responsible for your safety and your boat. Read the full disclaimer.
Last updated 2026-10-25
Related guides
How to Inspect Your Boat's Fuel Tank, Fill, Vent and Hoses
A leaking gas tank is one of the most dangerous problems a boat can have, and it usually starts out of sight. Learn how to inspect portable and built-in tanks, spot aluminum tanks corroding from below, know the ethanol risk for old fiberglass tanks, and check the fill, vent, hoses, clamps and sender, plus why tank replacement is a job for a pro.
How to Inspect and Replace Boat Fuel Fill and Vent Hoses
Old fill and vent hoses crack, go soft and leak gasoline into the bilge, often where you can't see them. Learn the signs of aging, which USCG hose types (A1, A2, B1, B2) belong on fill and vent lines, why fill hoses need two clamps at each end, how to check the vent fitting, flame arrester and anti-spill devices, and how a careful replacement is done.
How to Replace an Outboard Fuel Line and Primer Bulb
A cracked hose or a stiff primer bulb can leak gasoline, starve your engine or shed rubber into the fuel. Learn how to choose Coast Guard-rated fuel hose, the right connectors for your engine brand and good stainless clamps, install the bulb pointing the right way, leak-test the job and get rid of the old parts safely.
Fuel Anti-Siphon Valve: Diagnosing a Sticking Valve and Replacing It Safely
The anti-siphon valve at your built-in fuel tank stops gasoline from draining into the bilge if a fuel line breaks, but a cheap or sticky one can starve the engine at speed. Learn how to tell a restricted valve from a blocked vent or filter, how to clean or replace it with a quality valve of the right type, and why you should never pull the check ball out.
Fuel Gauge Reads Wrong or Empty? How to Test the Gauge, Sender and Wiring
Find out why your boat's fuel gauge reads empty, full, backward or jumps around, working from the free checks at the dash to testing the tank sender and replacing it safely. Most problems are a stuck float, a bad ground or a sender that doesn't match the gauge.
Fuel Smell on Board: What to Do and How to Find the Source
A gasoline smell on a boat is a fire and explosion warning. Learn what to do in the first minutes, the most common sources (fill and vent hoses, tank fittings, fuel lines, carburetors and injectors, overfilling), how to look safely, and when to stop and call a pro.
How to Check and Test a Gasoline Vapor (Fume) Detector
A gasoline vapor detector sniffs the bilge all the time and sounds an alarm long before fumes can explode. Learn how these detectors work, where the sensor belongs, how to test the system the way its maker says, what causes false alarms, what to do when it goes off, and why it never replaces the blower and your own sniff test.
Boat Bonding System Explained: How to Inspect Bonding Wires, Through-Hulls and Anodes
Understand what the green bonding wires on your boat do, how they tie through-hulls, running gear, tanks and engines to your anodes and DC negative, how to inspect and test the connections yourself, and which corrosion warning signs mean it's time for an ABYC-certified technician.

How to Tell if Your Boat's Flotation Foam Is Waterlogged
Learn the signs that the foam under the floor or seats of a small boat has soaked up water, how to check without tearing the boat apart, what the Coast Guard flotation rules mean for you, and why replacing foam is usually a big job for a pro.
How to Check a Boat for Transom and Stringer Rot
Many older fiberglass boats have wood inside the transom, stringers and deck, and water that gets in slowly rots it. Learn the tap test, the flex test, how to read a moisture meter and the other warning signs, and why a rotten transom or stringer is a structural job for a pro, not a weekend patch.
Ethanol (E10) Fuel Care: Stabilizer, Phase Separation, Fuel Lines and Tank Vents
Keep E10 gasoline from damaging your boat engine. Learn how to use stabilizer, test for water and phase separation, and inspect the fuel lines, primer bulb, anti-siphon valve and tank vent. Most fuel-related breakdowns start with one of these.

How to Get Rid of an Old Boat: Sell, Donate, Turn In or Scrap It the Right Way
An old boat nobody wants can cost you money for years. Learn your real options (selling as-is, donating, state vessel turn-in programs, landfill or dismantling), the tax rules on donations, how to cut your name off the registration and title, and why you should never abandon a boat.